
Storing language pairs as reference material
Transit helps you to store the language pairs of a finished project as reference material in a structured way.
You can specify how the language pairs should be copied to the selected reference folder and simply resolve any naming conflicts.

1. Open the desired project, in case it is not opened yet.
2. Select Reference material | Copy current project to reference folder from the resource bar.
Transit displays the Destination folder for reference material window:

Fig. 3-67: Destination folder for reference material window
3. Specify the reference folder into which Transit should copy the language pairs.
When you open the selection list, the following directories will be offered:
– all directories specified as reference folders in the project
– all directories from which files have been specified as reference material in the project
Via the … button to the right of the selection list, you can select any folder in the file system or create a new folder
4. In the Copy project language pairs section, specify how the language pairs are to be copied to the reference folder:
– Copy unchanged – Transit copies the language files as they are.
– Add file-name prefix – Transit adds the string from the input field as a prefix to the language file names.
As default displays the project name plus an underscore. However, the prefix can be changed as desired.
– Copy to subfolder – Transit creates in the reference folder a subfolder with the name of the project and copies the language files in there.
If language pairs are stored in subfolders, the subfolder structure is retained during copying.
5. Specify whether the reference folder and the option in the Copy project language pairs section you have selected for this project should in the future be preselected for all projects,
– for which the same customer as been specified in the project settings (Use as default for customer option).
– that have the same “User” scope and no customer specified (Use as default for user option)
– that also have the “Global” scope and no customer specified (Use as default option)
Confirm the settings selected by clicking OK.
If no naming conflicts occur, Transit copies the language files as specified.
If naming conflicts occur, Transit displays the following window:
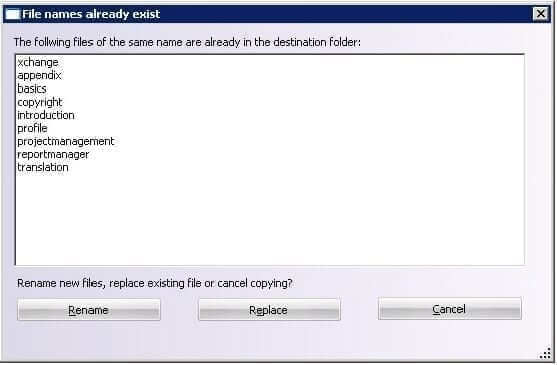
Fig. 3-68: File names exist already window
In this case language files having the same name already exist in the reference folder.
Select whether you want to overwrite the existing language files or rename the new language files.
– Click Replace to overwrite the existing language files with the new ones.
– Click Rename to rename the new language files and therefore retain the old reference files.
Transit displays the following window:
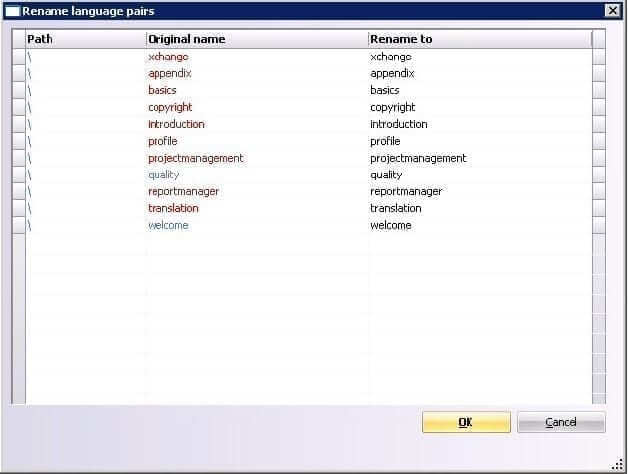
Fig. 3-69: Rename language pairs window
Path column – Transit displays the relative original path if files from subfolders have been imported into the project.
Original name column – Transit displays the original names of the new language pairs.
Names for which a conflict occurs are displayed in red.
Rename to column – Transit gives you the option to change the original names in order to resolve naming conflicts.
Click OK to finish this process and to copy the new language files into the reference folder.
3.10.2 Organising reference material
Via the Organise reference material window, Transit offers you the opportunity to filter reference material according to certain criteria and then to copy, move or delete the filtered files:
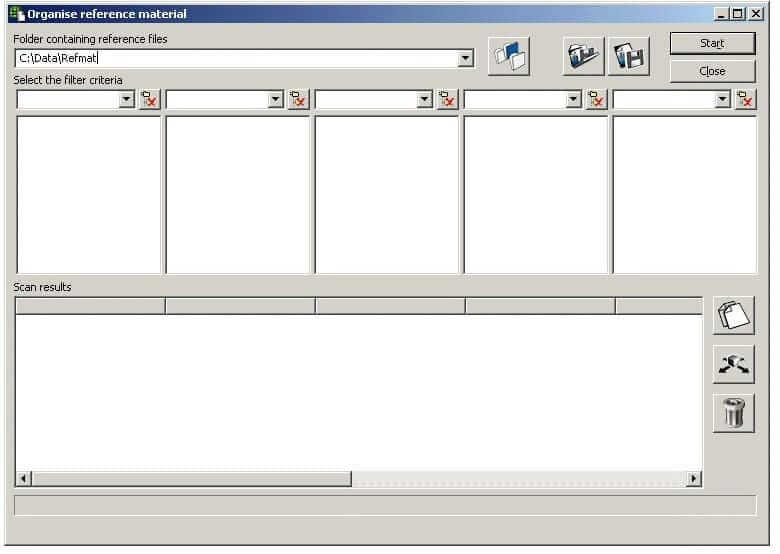
Fig. 3-70: Organise reference material window
Transit offers the following filter criteria to allow you search the reference material:
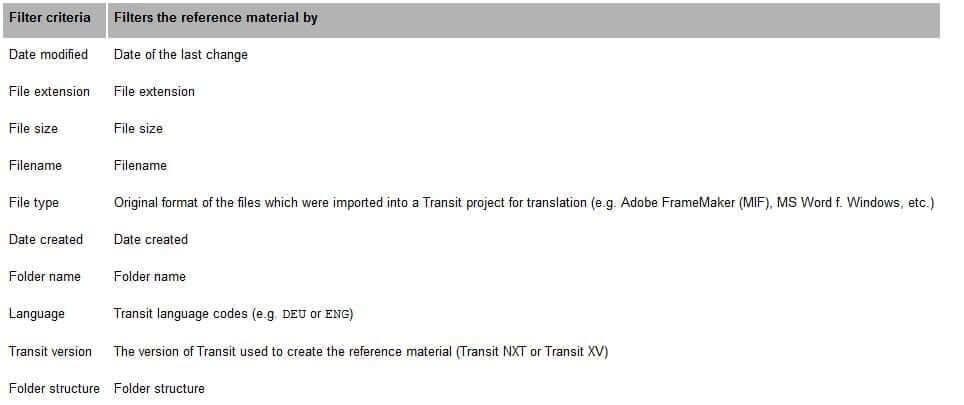
Tab. 3-6: Filter criteria in the Organise reference material window
By default, the following filter criteria are set in the five filter dropdowns (from left to right):
- Language
- Date created
- File size
- Folder name
- File extension
The Organise reference material window offers the following functions:
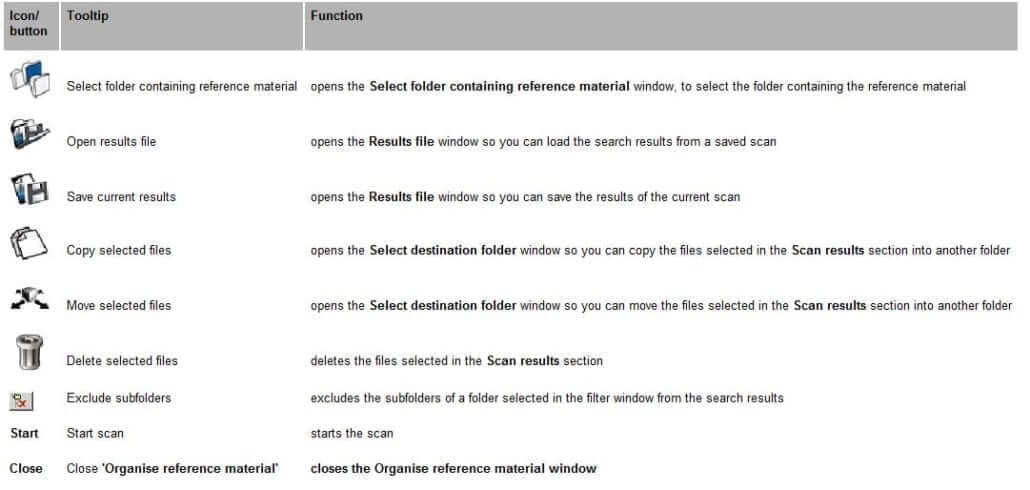
Tab. 3-7: Organise reference material commands
- Select Reference material | Organise reference material from the resource bar.
Transit displays the Organise reference material window.
2. Select the folder which contains the reference material. To do so, click on Select folder containing reference material.
Transit displays the Select folder containing reference material window.
3. Select the folder containing the reference material and confirm your selection by clicking OK.
Transit displays the Organise reference material window again.
4. Click on Start to begin the scan.
Transit searches the folders based on the five filter criteria. After the scan is complete, Transit displays the results in the Scan results section. Each of the five filter windows contains the files or folders corresponding to the selected filter criterion:
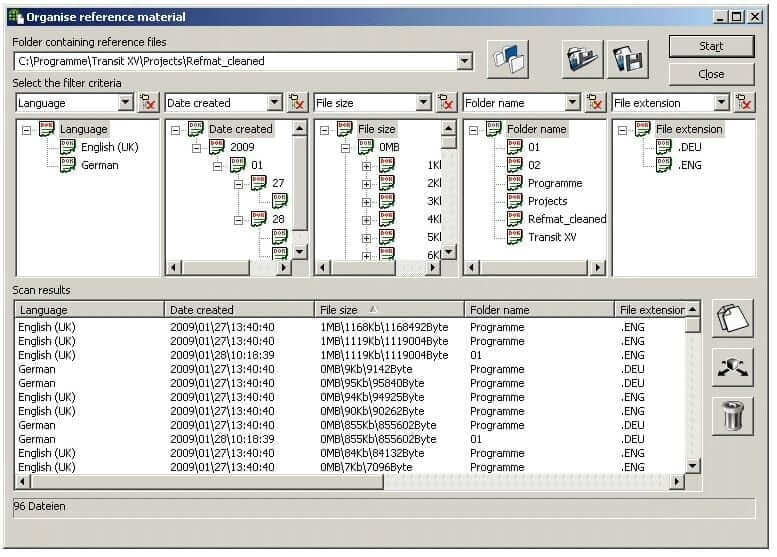
Fig. 3-71: Organise reference material window; Scan results
5. You now have the option to modify these scan results.
– If required, you can select different filter criteria from the dropdown lists:
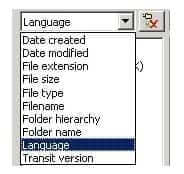
Fig. 3-72: Filter-options dropdown list in the Organise reference material window
– Clicking on the button to the right of the dropdown list allows you to exclude any subfolders in the filter window in question from the scan. By default, all subfolders are included in a search. This is indicated by the ‘normal’ (popped-out) appearance of the button’. Use the mouse to select the folder in the filter window whose subfolders you wish to exclude, and then click on the button to the right of the dropdown list.
The button now has a ‘pressed-in’ appearance, and the subfolders of the selected folder will no longer be included in the scan results.
When filter criteria are modified or subfolders excluded, Transit automatically updates the Scan results section. Therefore it is not necessary to restart the scan.
6. After you have achieved the desired search results, you can copy or move either individual files or all the files displayed in the Scan results section to another folder or delete the selected files. Select the files on which you would like to carry out these actions by clicking them with the mouse pointer. Hold the CTRL key at the same time if you wish to select several files from the list.
– Click on Copy selected files to copy the selected files into a different folder. In the Select destination folder window, select the folder to which you wish to copy the files. Confirm your choice by clicking OK.
– Click on Move selected files to move the selected files into a different folder. In the Select destination folder window which then opens, select the folder to which you wish to move the files. Confirm your choice by clicking OK.
– Click on Delete selected files to delete the selected files from the Scan results list.
1. Click on Save current results.
Transit displays the Results file window.
2. Select the appropriate folder and enter a name for the file in the File name field. Click Save to confirm the information entered.
3. Transit saves the file in the folder containing the scanned reference material, or in another folder selected by you, with the name .dat and then displays the Organise reference material window again.
1. Select Reference material | Organise reference material. from the resource bar.
Transit displays the Organise reference material window.
2. Click on Open results file.
Transit displays the Results file window.
3. Select the appropriate folder and the file and confirm your selection by clicking Open.
Transit displays the Organise reference material window with the scan results loaded up.
3.10.3 Modifying reference material
In Transit, you can search for any string in the reference material and have it replaced with another string – similar to the Transit editor.
For this purpose, you use the Modify reference material window:
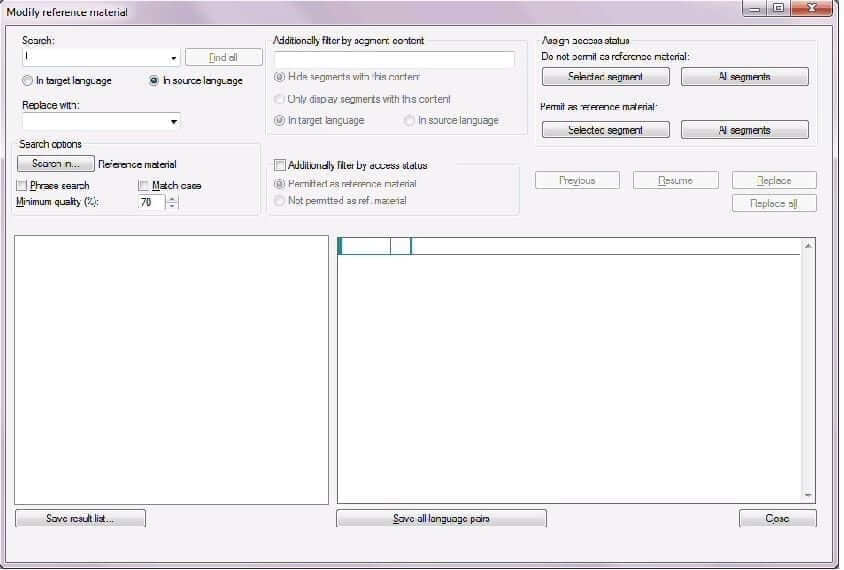
Fig. 3-73: Modify reference material window
In this window, you can specify the following search options:
- Search in… – Specify the language pairs in which Transit should search:
– Reference material – Transit searches the language pairs that are selected as reference material in the current project.
– Working folder – Transit searches the language pairs located in the working folder of the current project.
– Both – Transit searches both in the reference material and in the working folder of the current project.
You can specify a minimum status that the segments must have to be included in the search. You can specify it for the reference material and the language pairs in the working folder separately.
- Phrase search – Specify if the search string must appear exactly in the order entered. Transit then automatically uses a similarity of 100%.
- Match case – Specify if you want Transit to take account of case.
- Minimum quality (%) – Specify how similar the search string and the text in the segments should be.
This value is only relevant for word searches. If the Phrase search option is selected, Transit always searches for 100% matches.
In addition, you can specify the following filter options:
- Additionally filter by segment content section – Here you can enter segment content with which you want to restrict the search:
– Hide segments with this content – Transit searches only in segments without this segment content.
– Only display segments with this content – Transit searches only segments with this segment content.
This can be a word / phrase, a regular expression or a combination of the two.
Specify if this restriction should apply to the target language or the source language.
- Additionally filter by access status section – Specify if Transit should only search segments that are permitted or not permitted as reference material.
1. Select Reference material | Modify reference material from the resource bar.
Transit displays the Modify reference material window (Fig. 3-73).
2. Enter the search string in the Find field.
3. Specify whether to search the string in the target or the source language.
4. In the Replace with field, enter the string with which Transit replaces the string that is found.
5. Select the desired search and filter options.
6. Click Find all to start the search.
If Transit finds segments that match the search criteria, it displays a result list:
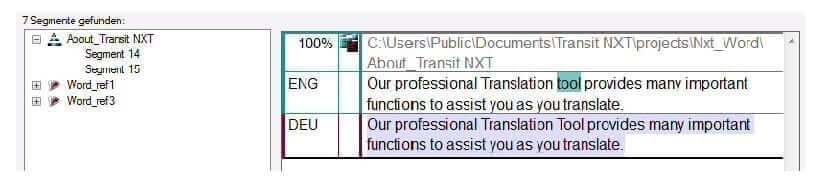
Fig. 3-74: Modify reference material window: Result list
On the right-hand side, Transit displays the content of the first segment found.
At first glance, you can see where the segments origin from:


7. You can edit the found segments as follows:
– Navigate through the result list:
To do so, select Next and Previous.
– Replace the search string in the selected segment:
To do so, select Replace.
– Replace the search string in all found segments:
To do so, select Replace all.
– Change the access status of selected segments (keep Ctrl key or Shift key pressed to select multiple segments):
To do so, select Selected segment below Do not permit as reference material or Permit as reference material.
– Change the access status for all segments found in a file:
To do so, select the desired file in the result list and click All Segments below Do not permit as reference material or Permit as reference material.
– Save the result list in a CSV file:
To do so, click Save result list.
When you have changed a segment, Transit marks it with a red pencil icon:
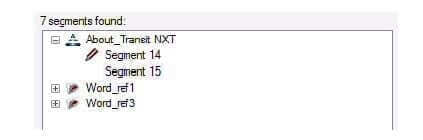
Fig. 3-75: Modify reference material window: Segment changed
8. Save your changes at any time by clicking Save all language pairs.
When you have saved a segment, Transit marks it with a green check:
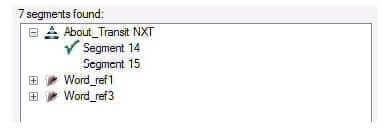
Fig. 3-76: Modify reference material window: Segment saved
9. When you are done, close the window by clicking Close.
3.10.4 Compacting reference material
Language pairs which you create during translation in Transit can be used as reference material for other projects. These language pairs may contain many identical segments if, for example, tables or lists were translated with many segments that are identical, the ‘internal repetitions‘.
Transit can compact your reference material so that it only contains a single copy of segments which occur multiple times or only differ slightly. This results in reference language pairs which are smaller in size and faster to transfer (e.g. by e-mail) and, in some circumstances, return faster pretranslations and fuzzy matches.

If you are using reference material with different file types, Transit generates a separate file for each individual file type. Transit also divides files if they would contain more that 15,000 segments. This means that Transit is able to generate smaller, easily-managed files.
Transit can create a reference extract from your reference material or compact the reference material:
- Reference extract
Transit can create a project-related reference extract when it imports the project files. The reference extract only contains the reference segments which can be used when translating the project, and thus reduces the number of unnecessary reference segments.
- Compacted reference material
Transit can compact your reference material, regardless of which project it appears in. The compacted reference material only contains a single copy of any reference segments which occur multiple times, thereby reducing the number of identical reference segments.
To create a reference extract, set the required options in the project settings (see section 3.6.18 “’Extracts’ project settings”) and import the project files (see section 3.7.3 “Performing an import”).
1. Select Reference material | Compact reference material from the resource bar.
Transit displays the Compact reference material window:
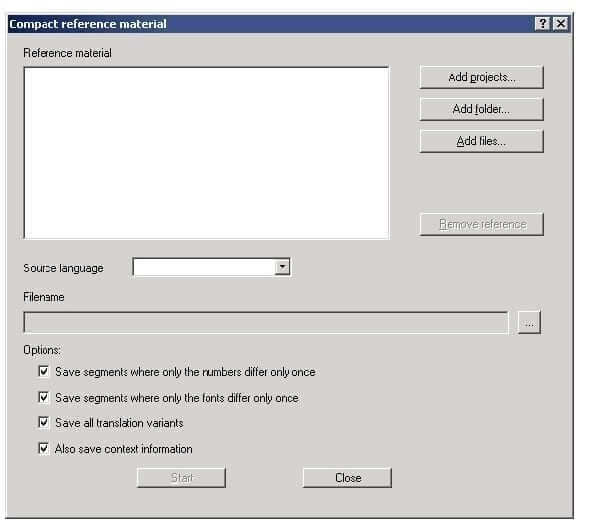
Fig. 3-77: Compact reference material window
2. Specify the language file which you would like to compact. The window gives you the following compact options:
Transit project
– Click on Add projects if you want to compact the reference material of a certain Transit project.
Transit opens the Project browser window.
– Select the desired project and confirm your choice with OK.
Transit files in a reference folder
– Select Add folder if you want to compact the Transit data in a particular folder.
Transit opens the Select reference folder window.
– Select the desired files and confirm the selection by clicking Open.
Individual Transit files
– Select Add files if you want to compress particular Transit files.
Transit opens the Select reference files window.
– Select the desired files and confirm your selection by clicking Open.
Transit displays the selected path in the Reference material field.
3. Specify the source language of the reference material: To do this, select the appropriate language from the Source language list.
Transit requires this information to decide whether there are translation variants or not.
4. Specify where Transit should save the compacted reference material: To do so, click on … to the right of the Filename field.
In the Reference extract window, select the drive and folder and enter a filename. Confirm your selection by clicking Save.
Transit displays the path in the Filename field:
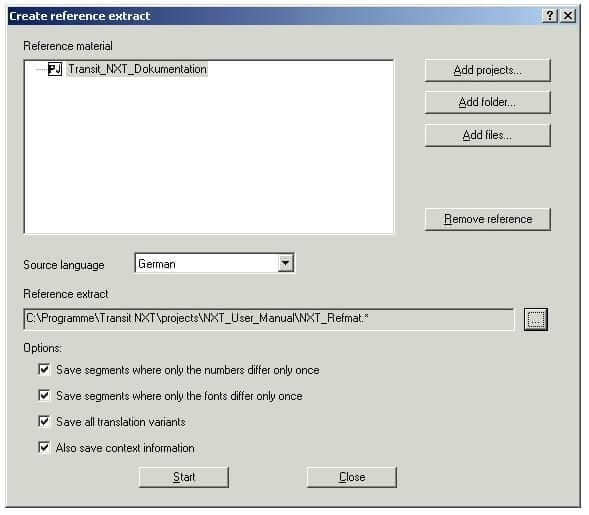
Fig. 3-78: Create reference extract window
5. Specify the segments which Transit should take into account:
– Save segments where only the numbers differ only once
This setting may be useful, as Transit can partially pretranslate segments with differing numbers and then carry over the numerical values from the current segment (see the paragraph “Details”). This would make otherwise identical segments with different numbers superfluous.
– Save segments where only the fonts differ only once
This setting may be useful, as Transit can partially pretranslate segments with differing fonts and then carry over the fonts from the current segment (see the paragraph “Details”). This would make otherwise identical segments with different fonts superfluous.
– Save all translation variants
This setting is relevant if there are different translations for the same source-language segments.
Do not check this option if you do not want the compacted reference material to contain variants. The compacted reference material will then contain one copy of each source-language segment with one translation.
Select this option if you want the compacted reference material to contain all the variants. The compacted reference material will then contain multiple identical source-language segments, each with one translation version.
– Also save context information
Select this setting if you want Transit to also save the corresponding context information along with segments whose content is identical but that differ in terms of their structure information (for example, if the same text appears once as a table heading and another time as a list point).
6. Once you have verified all the options and made any necessary changes, compact the reference material by clicking Start.
Transit displays the Reference extract window. The progress bar indicates what percentage of the reference material has already been compacted.
When Transit has compacted the reference material, it displays the following message:
Completed successfully.
7. Click Details if you want to view the statistics on the compacted reference material.
Transit displays the Details window with statistics on the compacted reference material.
– Click Save if you wish to save these statistics.
In the Save log as window, enter the drive, folder and filename for the log file. Click Save to confirm the information specified.
Close the Details window by clicking OK.
Close the Reference extract window by clicking OK.
8. Close the Compact reference material window by clicking Close.
Transit has compacted the reference material. You can now use it as reference material for your projects.
3.10.5 Importing and exporting TMX files
Transit can also import data created by other Translation Memory systems. Equally, you can export Transit language pairs to allow this data to be edited in another environment. This happens through the TMX data interchange format.
More details on exchanging data via TMX can be found in the Transit/TermStar NXT Reference Guide, chapter 2 “Exchanging reference material via TMX”.
3.10.6 Creating an alignment project
You may have reference material which was not translated in Transit and you only have in the original file format. However, Transit is only able to use translations as reference material if they are in the Transit format. An alignment project makes it possible to import source-language documents and their translations into Transit. Alignment is then carried out, and this generates Transit language pairs which can be used as reference material for other projects.
You can create an alignment project from the resource bar by selecting Reference material | Alignment | Create alignment project. You can find more detailed information about creating alignment projects in chapter 2 of the “Transit NXT Alignment Tool” manual.
Open the project browser by selecting Reference material | Alignment | Project browser. Only alignment projects will be displayed here, if any are available. To open a standard project, select Project | Administration | Open.
3.10.7 Converting Transit XV reference material
Transit NXT can also use reference material from Transit XV projects by converting them.
1. Select Reference material | Convert Transit XV reference material to Transit NXT from the resource bar.
Transit displays the Convert reference material to Transit NXT window:
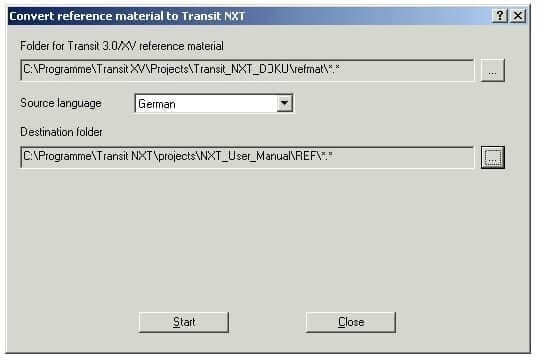
Fig. 3-79: Convert reference material to Transit NXT window
2. Specify the folder where the Transit XV reference material is located. To do this, click on the … button to the right of the Folder for Transit 3.0/XV reference material field.
Transit displays the Folder for Transit 3.0/XV reference material window.
3. In this window, select the drive and folder for the reference material and confirm your selection by clicking Open.
Transit displays the selected folder in the Folder for Transit 3.0/XV reference material field. When a folder is selected, Transit also takes account of any data contained in subfolders.
4. If you know it, you should now specify the source language which Transit should use as the basis for the reference material conversion. To do this, select the appropriate language from the Source language list. If you do not know the source language, select the — option. In this case, Transit will determine the source language based on the timestamp for the individual segments, i.e. it will select the language where a majority of the segments have an older timestamp as the source language.
Example: a folder which is to be converted contains language pairs for English and French. If the “—“ option is selected, Transit will compare the timestamp for the French and the English segments. If it turns out that, for example, the French segments have an older timestamp in 67 percent of cases, Transit will select French as the source language.
5. Specify where Transit should save the converted reference material. To do this, click on the … button to the right of the Destination folder field.
6. In the Destination folder window, select the drive and folder and confirm your selection by clicking Open.
Transit shows the path for the folder in the Destination folder field. The folder structure of the converted reference material in this folder will match that of the selected Transit XV reference-material folder.
7. Now you can start the reference material conversion process by clicking Start.
Transit displays the Reference material conversion window. The progress bar indicates what percentage of the reference material has already been converted. When Transit has converted the reference material, it displays the following message:
Completed successfully.
8. Close the Reference material conversion window by clicking OK.
9. Close the Convert reference material to Transit NXT window by clicking Close.
Transit has converted the Transit XV reference material. You can now use it as reference material for projects in Transit NXT.
If the reference material is in a user-defined file format not yet defined in Transit, the following message will appear during the conversion process:
Unknown file format
To enable Transit to interpret user-defined file formats, the ffd file (*.ffd, file format definition) must be present in the config\sys folder of your Transit installation. If this is not the case, copy the required ffd file into this folder.
If you are using reference material converted from Transit XV to pretranslate in Transit NXT, it will not be possible for certain markups to be assigned automatically (for information on this, see section 6.5.3 “Markups in converted reference material”). You may also be interested in our Transit NXT Keyboard Shortcut Guide
Document Formatting for Faster Translation Delivery

