
Translating text
If the language pair is open, the text appears in the editor window in two panes – green for the source language and red for the target language.
When you begin translation, the majority of the text in the target-language pane is usually not translated and is therefore still in the source language. If Transit has found matching segments in the reference material during the import process, these segments will already have been pretranslated.
In the target language window, you now can overwrite the text which is still to be translated. Transit shows the corresponding source language text in the source language window.
During translation, you have the choice between working using the ribbon bar or using keyboard shortcuts:
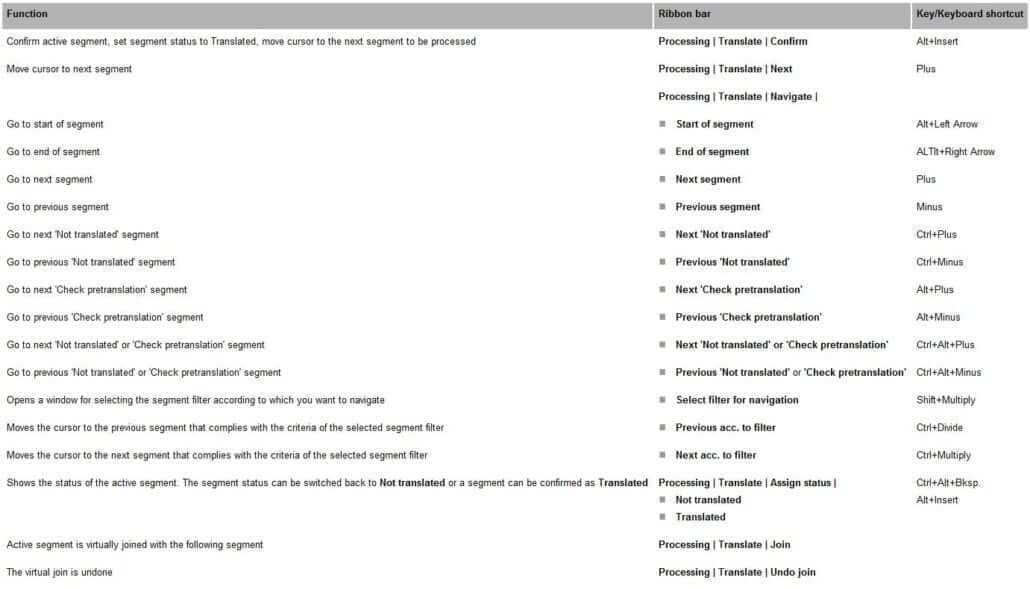 Commands in the Translate group of the Processing tab and their associated keyboard shortcuts
How do I translate a text in the Transit editor?
1 In the target-language pane place the cursor in front of the text you wish to translate.
2 Enter your translation and delete the old text.
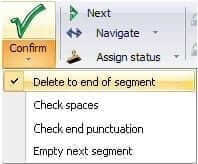
Transit offers additional options for this task. Clicking on the arrow at the bottom of the Confirm button opens a list containing the following options:
 Options for the Confirm button
Transit indicates which options are currently selected with a checkmark to the left of each selected option. Should you wish to deselect an option, simply remove the respective checkmark by clicking on the option in question.
– Delete to end of segment – Here you can specify whether the old text should be deleted automatically when the translation is confirmed.
The Delete to end of segment option is the default. If it is selected, when you click on Confirm or press the shortcut ALT+INS, Transit will automatically delete the remaining, red-underlined source text from the segment.
– Check spaces – Here you can specify whether Transit should check for a space at the end of the source and target-language segment when the translation is confirmed and display respective messages in case of inconsistencies.
– Check end punctuation – Here you can specify whether Transit should check for punctuation signs at the end of the source and target-language segment when the translation is confirmed and display respective messages in case of inconsistencies.
– Empty next segment – Here you can specify whether Transit should empty of contents of the respective following segment when the translation is confirmed.
If the Empty next segment option is selected, when you click on Confirm or press the shortcut ALT+INS, Transit will automatically empty the following target-language segment. Selecting this option deselects the Delete to end of segment option.
3 Transit supports you in your translation work with the following functions:
– If Transit finds an entry in the dictionary for a word in the segment, this word is highlighted in yellow in the editor. In addition, Transit displays the entry in the Terminology window.
– Press the shortcut ALT + ENTER if you want Transit to display a suggested translation from the fuzzy index for this segment.
Transit displays the results in one of the fuzzy-window types, either the fixed fuzzy window or the bubble window.
– If Transit has pretranslated the segment and given it the status Check pretranslation, it uses update markers to indicate which part of the text you should check. Please refer to section 5.6 “Markups in the Transit editor” for more detailed information.
– You may want to format the text manually in some instances, (e.g. mark as underlined or in italics).
– If there are markups in the segment, it may be necessary to reassign, copy or delete them.
– You can make comments on segments or search for comments.
– If you want to join two sentences in the source language to make one translated sentence in the target language.
4 When you are finished translating the segment, confirm the translation by pressing the shortcut ALT+INS.
Transit changes the status of the segment to Translated.
– It is also possible to assign this status by clicking Confirm under Processing | Translate.
– Transit moves the cursor to the next segment to be processed.
In doing so, Transit bypasses all the segments which have already been translated or which do not have to be translated.
– Transit automatically searches the fuzzy index for fuzzy matches for the next segment to be translated.
5 Press the CTRL+ALT+BACKSPACE shortcut if you wish to undo the translation of a segment.
Transit replaces the text translated by you or Transit with the text of the source language. This means you can also undo translations for segments which Transit automatically pretranslated during the import.
6 Continue translating as explained from point 1 onwards.
Do not forget to save the language pair when you are finished translating it.
Quality assurance after translation
To guarantee top quality of your translation, we recommend that the following items are checked after translation:
- Spellcheck
As with every good word processing program, you can use the spellcheck function in Transit to check your spelling. You can use dictionaries and/or reference material for spellchecking
- Checking terminology
Using this function, you can check whether the terminology from the project dictionaries has been used in the translation.
- Checking markups
Markup mode enables you to establish whether the markups in the source and target languages are consistent.
- Statuses for the translation report
Using segment status, check whether the text is completely translated.
Please refer to section 6 “Quality assurance” for more information on this topic.
1. Update markers in the Transit editor
Overview
If a text differs from the reference text only in terms of numbers and markups, Transit accepts the text from the reference material and the markups and numbers from the file to be translated. Such segments are assigned the status Check pretranslation. The modified elements are highlighted in the Transit editor by so-called ‘update markers’:
 Example of the appearance of update markers in the Transit editor
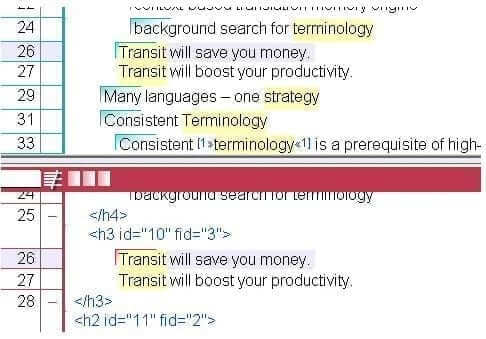
This helps you to quickly see what you need to check and potentially change. Transit also displays the update markers in the Source fuzzy window . The display in the Source fuzzy window makes it possible to see where the differences lie between the new segment and the reference segment. To call up or update the Source fuzzy window, press the shortcut CTRL+ENTER.
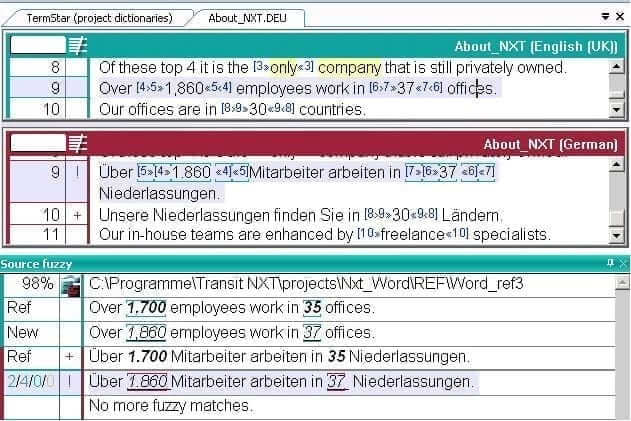 Example of the appearance of update markers in the Transit editor and in the Source fuzzy window
In the example in figure 5-11, the numbers in the active segment have been changed and the formatting has been changed from bold italic in the reference segment to just italic (for more details on the information given in the fuzzy windows, see section 5.4 “Dual Fuzzy windows”). Transit has carried over the translation from the reference segment and updated the numbers and markups according to what appears in the current segment.
 Automatic update for differing numbers and markups
If the number of markups in the reference segment is lower than in the new segment which is to be translated, Transit still carries over the translation from the reference material, but adds update markers and gives the segment the status Check pretranslation. However, in this case, Transit does not automatically insert the ‘new’ markups:
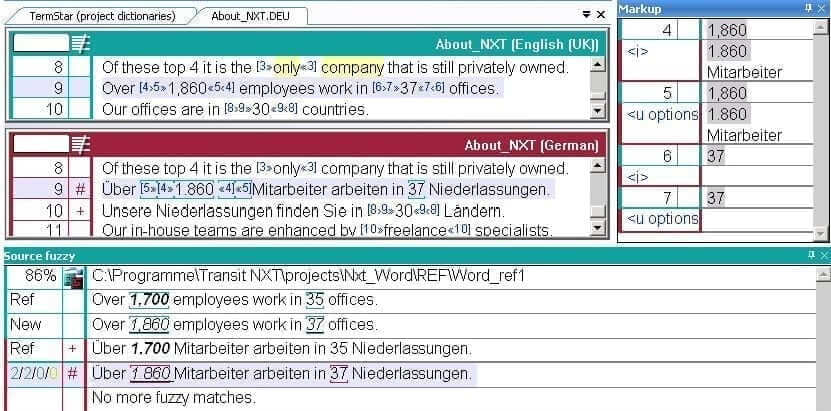 Example of how Transit indicates a differing number of markups in the reference segment and the segment to be translated
In the example in the Figure 5-12, the markup for italics for the number ’37’ in the current target-language segment is not inserted automatically. This markup must either be inserted manually or when checking the text using markup mode. You can find more detailed information on this in section 5.6.4 “Inserting and copying markups during translation” and in section 6.5 “Checking markups”.
Transit automatically deletes update markers during the export phase
Transit automatically deletes the update markers if you assign a segment with the status Translated.
Transit automatically deletes the update markers when you export the project.
However, we recommend you delete the markers during translation or while checking the segments. In this way, you know which segments you have checked.
2. Segments in the Transit editor
Overview
During import, Transit breaks down the text into individual, easily-managed sections known as “segments”. These are the sections that you translate. These are also the sections of text which Transit searches for and replaces when it compares the text with existing translations.
Transit saves information for each segment so you can track exactly whether and how the segment was translated. Transit displays this information in the scratchpad window.
Each segment has a status which provides you with information on the stage of the translation process the segment has reached. In effect, the status is an indicator of the “quality“ of the segment. Transit can display this status in a column in the editor and also in the segment marker at the end of a segment:
 Segment status: display options in the Transit editor
Under View | Segments, you can specify how Transit should display the segment status.
Display of the segment status in the Transit editor
Transit can display the segment status in the editor. The marker can either be displayed at the end of the segment or in the info column. How the segment status is displayed depends on which setting you have selected. In the info column, the segment status is displayed in a separate column, to the right of the segment number. The Example column in the following table shows how different segment markers appear at the end of a segment:
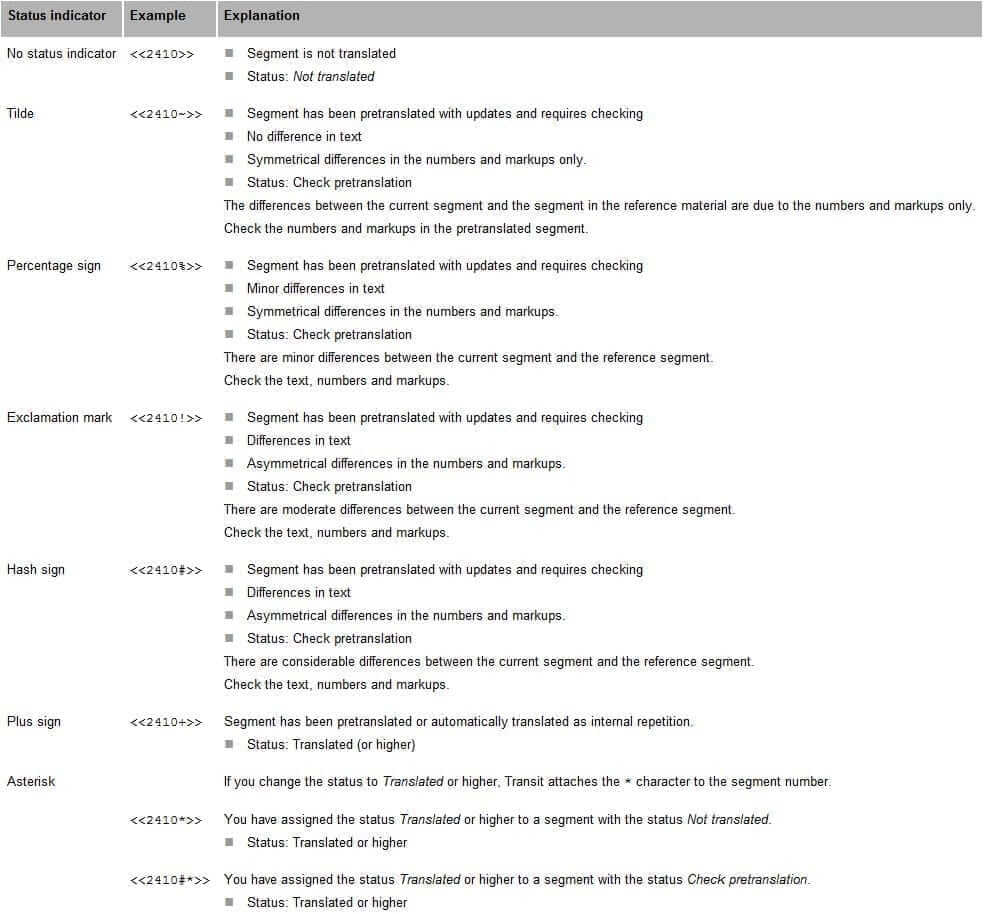 Displaying the segment status with the segment marker
Changing the segment status while translating
In order for you to work efficiently and effectively with segment statuses, the status of a segment must always correspond to the last processing step taken for the segment. Transit offers you the following two options for this:
- You can automatically update the segment status during translation by confirming the translation for a segment with the keyboard shortcut ALT+INS, which sets the segment status to Translated.
- You can also manually assign the Translated status to a segment by selecting Processing | Translate | Assign status.
Automatically update the segment status during translation
We recommend that you ensure the segment status is automatically updated during translation. This allows you to track the course of the project and perform a statistical analysis of the translation.
3. Split a segment or join a segment to the next
In Transit, it is possible to split a source language segment “on the fly” during translation work at a particular position in the segment. It is also possible to join a source language segment to the next.
Splitting a segment may become necessary when Transit e. g. treats two sentences during segmentation as one segment because of a missing blank after the full stop in the original document.
Constraints of this functionality
Splitting and joining of source language segments is only possible if the project has only one target language.
The joining of source language segments works only within a paragraph. Joining segments beyond paragraph boundaries is not possible.
——————————————————————————–
How do I split a segment?
1 In the source language segment, place the cursor at the position where the segment should be split in two.
2 Right-click to open the context menu and select the Split segment option.
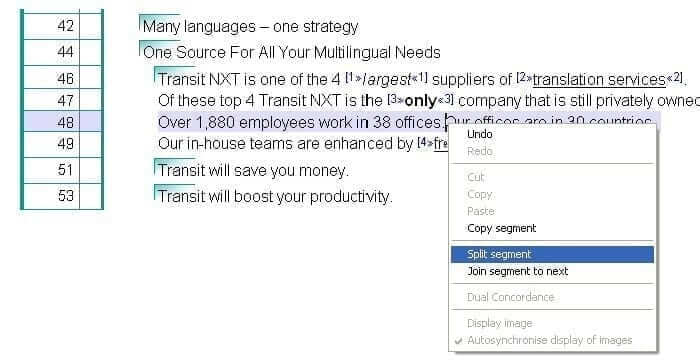 Split segment option
Transit splits the segment in the source language as well as the target language window at the desired position and updates the segment numbers of the following segments in both windows accordingly.
To undo the splitting, if required, follow the two steps described in “How do I join a segment to the next?”.
If you split a segment that has already been translated, the target language segment is split approximately at the same position as in the source language. Likely, you may need to slightly adapt the two resulting target language segments where necessary.
How do I join a segment to the next?
1 In the source language segment, place the cursor in the segment that should be joined to the next.
2 Right-click to open the context menu and select the Join segment to next option:
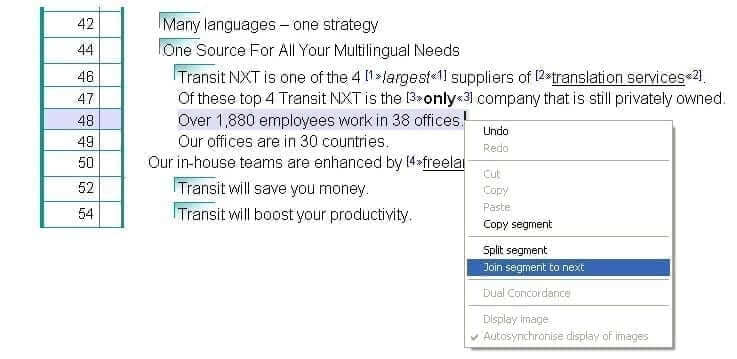 Join segment to next option
Transit joins the desired segment in the source and target language windows to the next segment and updates the segment numbers of the following segments in both windows accordingly.
4. Joining segments virtually and split virtually joined segments
Transit gives you the option to virtually join segments. This may be of interest if content which is spread over two or more sentences or segments in the source language needs to be joined to become a single segment in the target language. This is predominantly the case with multilingual projects or for projects where the structure of the content is irregular (e.g. if sentences/units of meaning are interrupted by line breaks or similar).
Using the Join function, Transit can combine such segments. In Transit, segments which are ‘virtually’ joined in this way form a single unit, thus allowing the content to be translated according to requirements. However, the number of segments remains unchanged, meaning that the segmentation of all language pairs is still uniform. This function can be selected either from the ribbon bar, via Processing | Translate | Join or via a context menu from the editor (Virtual segment join).
Example:
A document in which the target language is English is being translated into German.
The sentences
‘Transit will save you money’
and
‘Transit will boost your productivity’
are to be joined in the target language (German) as follows (fig. 5-16):
‘Transit spart Ihnen Geld und steigert auch Ihre Produktivität’
 Virtual segment joining: source language situation
How do I virtually join segments?
1 Enter the translation into segment 26 and mark the segment as ‘Translated’ using ALT+INS.
2 Delete the text ‘Transit will boost your productivity’ in segment 27 and mark this segment as ‘Translated’ with ALT+INS as well:
 Virtual segment joining: enter the translation in the first segment
3 Place the cursor in the segment which contains the translation (seg. 26) and select the option Virtual segment join from the context menu.
Transit joins the active segment and the following segment to become a single unit:
 Virtual segment joining: segments joined
In the segment-number column, you can see that the joined segments are assigned the number of the first segment, but that the number of other segments and their numbering have not changed.
If necessary, to separate the joined segments again, either select Processing | Translate | Undo join or select Undo virtual segment join from the context menu in the active segment.
Virtual segment joining
This function can only be used for adjacent segments. There must not be any segments only containing markups between these segments.
Transit also treats virtually joined segments as a single unit when they are used as reference material.
——————————————————————————–
If required, you have the option to split virtually joined segments again at a later point in time.
How do I split virtually joined segments:
1 Place the cursor at the position where the virtually joined segments are to be split (in the example: behind „Transit spart Ihnen Geld und“).
2 Select the option Split virtually joined segments from the context menu of the active segment.
Transit splits the virtually joined segments at the cursor position. The segment part in front of the cursor mark stays in segment 26, the segment part behind the cursor mark is taken over to the following segment 27.
 Virtually joined segments split again
If the virtually joined segment consists of more than two joined segments, these segments continue to stay virtually joined. You may also split them, if needed.
5. Not permitting segments as reference material
It is possible to not permit segments to be used as reference material for certain reasons.
Example:
Due to an incorrect formatted original document a sentence is divided into two segments. Between the two segments there is a segment that only contains markups.
Due to the markup segment, joining the two text segments virtually is not possible.
In this case, it is possible to enter the translation of the complete sentence into the first target segment, empty the second target segment, and then not permit the two text segments as reference material.
How do I not permit a segment as reference material:
1 Right-click the desired segment in the target-language window.
Transit displays the context menu of the target-language window:
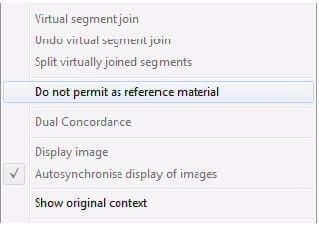 Context menu of the target-language window
2 In the context menu, select the Do not permit as reference material entry.
The segment is not permitted as reference material and assigned the Not as reference access status. The access status is displayed in the Access field of the Segment info window.
Segments not permitted as reference material are not taken into account:
– for translation suggestions of the current project
– for pretranslation of future projects
– for translation suggestions of future projects
– during concordance search
– when creating a reference extract
– when compacting reference material
– when exporting the reference material into a TMX file
——————————————————————————–
How do I permit a segment as reference material:
1 Right-click the desired segment in the target-language window.
Transit displays the context menu of the target-language window:
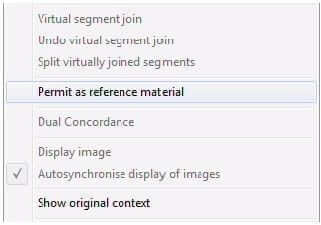 Context menu of the target-language window
2 In the context menu, select the Permit as reference material entry.
The segment is permitted as reference material again.
Context menu entry is active depending on the access status
The context menu entry Do not permit as reference material is greyed out if the segment has the access status Read only.