Creating a Project in Transit
To translate a document using Transit, you must first create a new project. The project wizard helps you to do this by guiding you step-by-step through the functions.
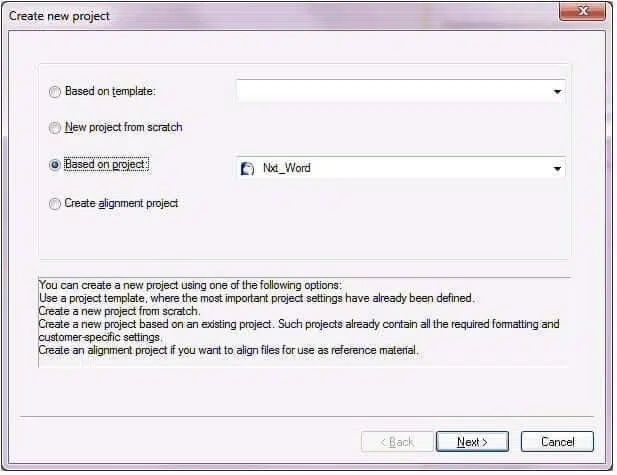
Selecting Project | Administration | Create takes you to the Create new project window:
 Create new project window
You have the following options when creating a project:
- Create a new project. There are two options available for this:
- The option Based on template allows you to select from a list of user-defined project templates and adapt these to suit your current project.
- The option New project from scratch lets you create a new project from scratch.
Please refer to “Creating a new project” for more information on this topic.
- Create a follow-up project.
- Using the option Based on project, you can create a follow-up project. With this option, Transit suggests the settings of an existing project so you only have to change the settings which differentiate the new project from the old project. Please refer to “Create a new project based on an existing project” for more information on this topic.
- You can create an alignment project.
- If you have an original and one or more translated versions of a document, with the option Alignment project, Transit gives you the option to create reference material from these original documents, which you can then use for translation projects in Transit. You also have the option of creating an alignment project using the resource bar. You can find more detailed information about creating alignment projects in chapter 2 of the “Transit NXT Alignment Tool” manual.
Shared project with TermStar
When you create a project in Transit, this is also used by the TermStar terminology management system. The Transit project also contains all the settings which TermStar requires.
This means that if you want to use or edit terminology for a translation project, there is no need to create a separate project in TermStar.
2. Creating a new project
Selecting Project | Administration | Create in Transit gives the user the option to create a new project from scratch or a project based on a template.
It is also possible to select predefined default project templates using the Interfaces button in the resource bar, which you can then adapt for your project (details about this can be found in section.4 “Creating a new project via the resource bar”).
Please refer to “Create a new project based on an existing project” if you want to create a follow-up project based on an existing project.
If you wish to create a new project template, please refer to section 5 “Creating a new project template”.
Selecting and creating predefined project templates
Transit provides you with project templates that are specific to the document type, which means that you do not have to make certain settings when you create a new project. Alternatively, you can also create your own project template. This is achieved either by taking an existing project template and amending it accordingly, or else by creating an entirely new project template from scratch. Please refer to section “Creating a new project template” for more detailed information on this topic.
——————————————————————————–
How do I create a new project?
1 Select Project | Administration | Create.
Transit displays the Create new project window:
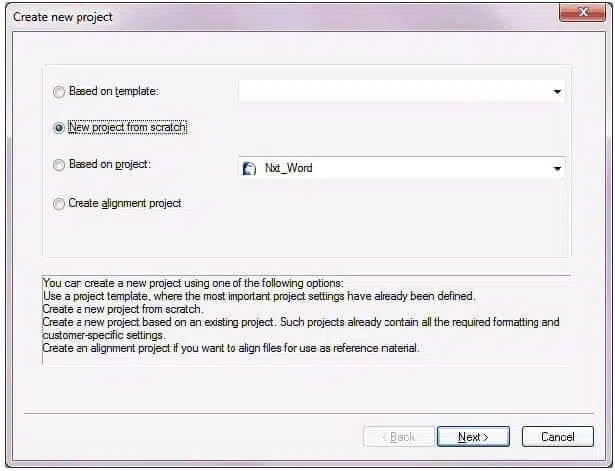
2 To create a new project, select New project from scratch. Click Next to confirm the option selected.
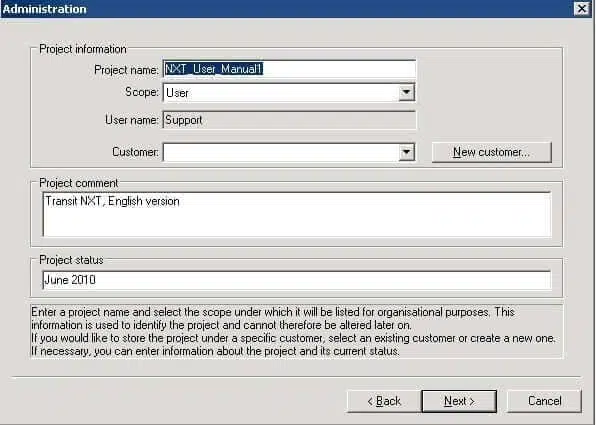
Transit displays the Administration window:
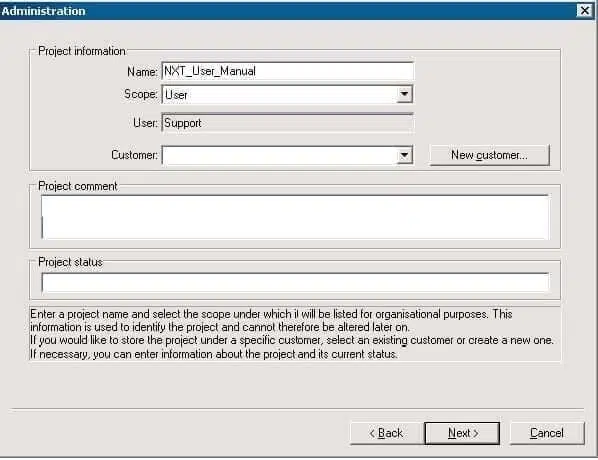
3 Specify the administrative information.
– Project name – Enter the name of the project here. When choosing a name for the project, ensure that it does not contain any invalid characters. If an invalid character is used, the following error message appears:
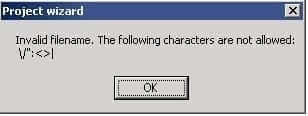 Invalid filename message
The wildcards ‘?’ and ’*’ are also not allowed. If one of these characters is used, the following error message appears:
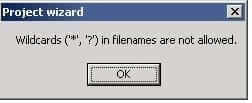 Wildcards error message
– Scope – Select the scope to which the project should be assigned:
Global, User (user-related) or Customer (customer-related).
– If you have selected Customer from the Scope list, select the desired customer from the Customer list.
– Click New customer to create a new customer. Transit displays the Create new customer window:
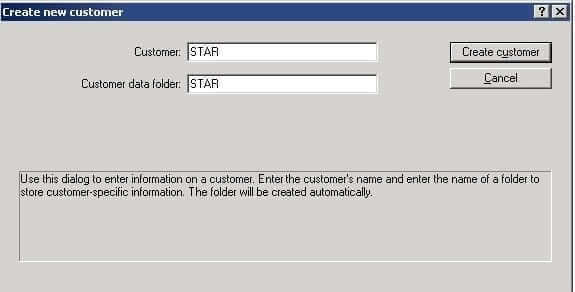 Create new customer window
Enter the name of the customer in the Customer field. Transit automatically copies the name into the Customer data folder field. Transit saves customer-specific settings to this folder.
Click Create customer to confirm the information entered for the new customer. Transit displays the Administration window again. You can now select the new customer from the Customer list.
– You can enter a comment on your project in the Project comment section.
– In the Project status section you can enter remarks on the status of the project, such as ‘Imported’, ‘Statistics created’, ‘Imported and checked before translation’, ‘Sent to translator’, etc.
Click Next to confirm the information entered in the Administration window.
Transit displays the Languages window. If you are creating a new project from scratch, the source and target language fields will be empty, because this option does not set predefined languages:
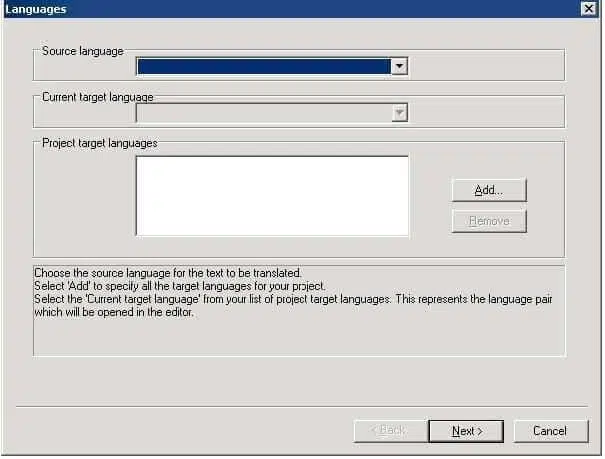
4 Specify the source and target language(s) for the project.
– Source language – Select the language you require from the list.
– Current target language – Select the language you require from the list.
You can only select languages specified as ‘Project target languages’. When creating a new project, it is first necessary to add the required languages in the Project target languages section.
– Project target languages – Transit displays all the target languages for the project in the Project target languages section.
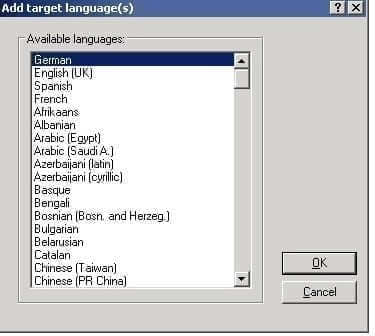
To add a target language, click on Add. Transit displays the Add target language(s) window:
 Add target language(s) window
Select one or more languages which you want to add to the project as target languages. To select several target languages, press and hold the CTRL key and then click on the desired languages in the list. They appear highlighted. Confirm your selection with OK.
Transit displays the Languages window again with the target languages added. You now have the chance, if required, to select a different language as your current target language:
![Languages window with target languages added [spacer]](https://www.star-ts.com/wp-content/uploads/2018/02/24.jpg.webp)
– To remove a target language from the project, select the language in the Project target languages section and click Remove.
This does not cause Transit to delete the files for the removed target language, it just means that the language is no longer used in this project.
Click Next to confirm your settings in the Languages window.
Transit displays the Folders window with the drive and path of the working folder:
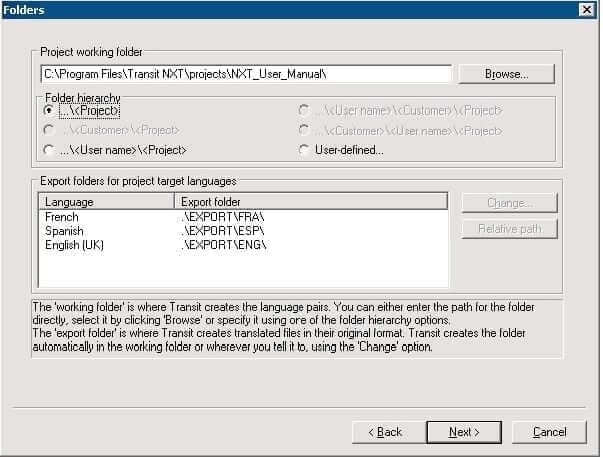 Folders window
5 Specify the working folder which Transit should use to save all the files for this project.
Transit initially creates the appropriate folder as a subfolder of Projects in your Transit installation folder. This path for this folder is displayed in the Folders window.
– If you would like to store the project in a different folder, select the Browse option.
Transit displays the Select working folder window:
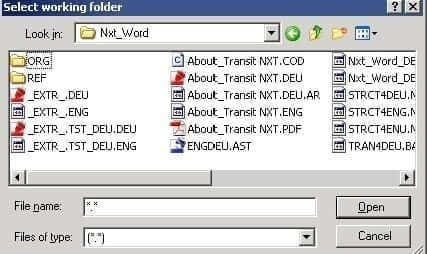 Select working folder window
– Select the desired files and confirm the selection by clicking Open.
Transit displays the Folders window again.
By default, Transit creates a subfolder of the project folder to serve as the export folder (e. g. .\EXPORT\ENG). However, it is also possible to select a different folder.
– Under Export folders for project target languages, click on Change.
Transit displays the Export folder window.
– Click on Browse.
Transit displays the Select export folder window.
– Select the desired folder and confirm by clicking Open.
Transit displays the path for the new folder in the Export folder window.
– Confirm your selection by clicking OK.
Click Next to confirm the information entered in the Folders window.
Transit displays the File type window:
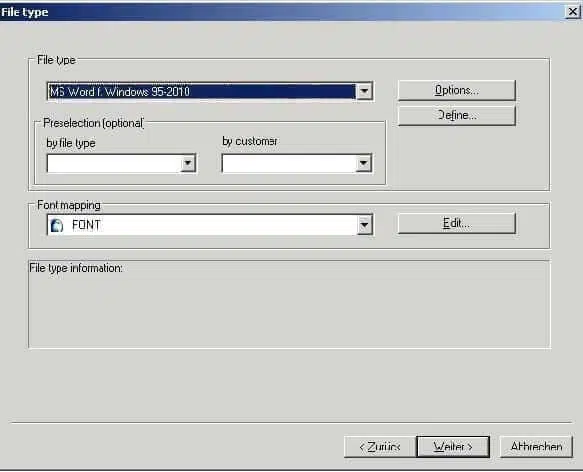
6 The window initially displays the default file type. You can now specify the type of file that you want to import.
– If you want to import a different file type, select the desired file type from the File type list.
To limit the choice of available options (for example, because you are searching for particular file types or for data for a particular customer), you can restrict the list using the Preselection (optional) section.
– Font mapping lets you assign particular fonts to the target-language document which is to be created.
– Click on Options to configure additional settings for your particular file type (not available for all XML, HTML, SGML, Text and GRIPS file types).
Transit displays the File type settings window.
Specify the settings required and confirm the settings by clicking OK.
Please refer to the 3.6.8 “Additional file type settings” section and the “Tips & Tricks for All File Formats” manual for information on other settings for specific file types.
Click Next to confirm the settings made in the File type window.
Transit displays the Files window:
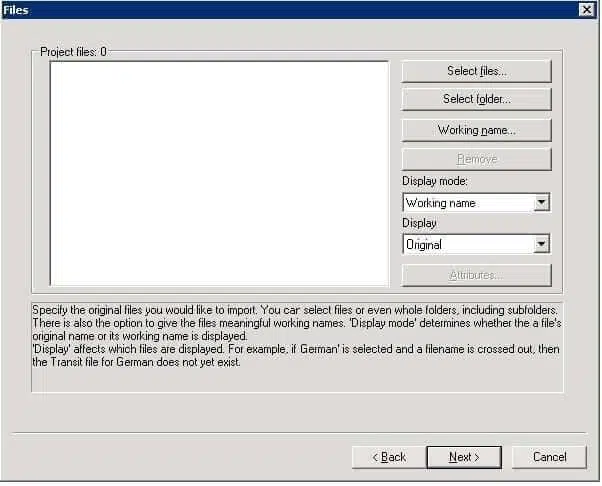
7 Specify which files you want to import and translate in Transit.
– If you wish to select individual files, click Select files.
Transit displays the Select original files window. Select the desired files and confirm the selection by clicking Open.
– If you wish to select all the files in a folder, click Select folder.
Transit displays the Select folder with original files window. Select the desired folder.
Select Include subfolders if you want Transit to import the contents of all subfolders as well.
Confirm your selection by clicking Open.
– If you want to remove a file or a folder from the project, select the file/folder and click Remove.
– If you want to assign a working name to a file, select the file and click Working name.
Transit displays the Working name window:
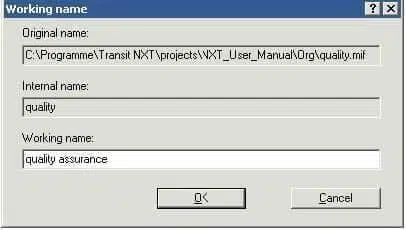
Enter the desired working name into the Working name field. Confirm your entry with OK.
– From the Display mode list, select how Transit should display the file names in the Project files section:
Working name – Transit displays the working name.
Original name – Transit displays the path and original name of the file.
– From the Display list, select the files which Transit should display in the Project files section.
Transit then indicates in the Project files section whether the corresponding language files already exist.
If the files do not yet exist, it may be that they still need to be imported for the language selected. If you are creating a new project, the source and target-language files will not usually be available, as you have not yet carried out an import.
– If you want to specify specific attribute values for the added project files, click Attributes.
By doing so, you provide the project files with additional information that you can use later on – for importing them into a TM Container and exporting them as TMX files.
For further information on this please refer to the “Transit NXT – Managing and using TM Containers” manual.
Click Next to confirm the settings made in the Files window.
Transit displays the Reference material window:
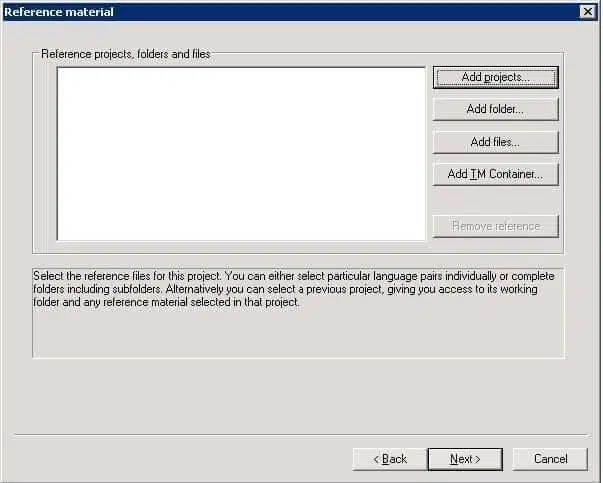
8 Specify which files you want to use as reference material
– To select a project as reference material, click on Add projects.
Transit displays the Project browser window, which lists all existing projects. Select the desired project.
Confirm your selection with OK.
– To select all the files in a folder, click Add folder.
Transit displays the Select reference folder window. Select the desired folder. If the folder contains subfolders, they are automatically included in the selection.
Confirm your selection by clicking Open.
– To add individual files as reference material, click on Add files.
Transit displays the Select reference files window. Select the desired files and confirm the selection by clicking Open.
– To add a TM Container or TM Filter as reference material, click on Add TM Container.
Transit displays the Add TM Container window. Select the desired TM Container or TM Filter and confirm by clicking Select.
TM Container function must be activated
The Add TM Container button for adding a TM Container or TM Filter as reference material is only available if the TM Container function has been activated for your licence.
If you have any questions on this, please contact your local STAR office.
——————————————————————————–
– If you want to remove a project, folder or file from the list of already selected reference material, select the corresponding entry and click Remove reference.
Click Next to confirm the settings made in the Reference material window.
Transit displays the Dictionaries window:
![Dictionaries window [spacer]](https://www.star-ts.com/wp-content/uploads/2018/02/31.jpg.webp)
9 From the Current dictionary list, select the dictionary to which Transit should add any new terminology.
In doing so, you can only select a dictionary which has been specified as a project dictionary. If the required dictionary is not contained in the list, you must first add it to the Project dictionaries section.
To assign a dictionary to the project, click on Add in the Project dictionaries section.
Transit displays the Add dictionaries window:
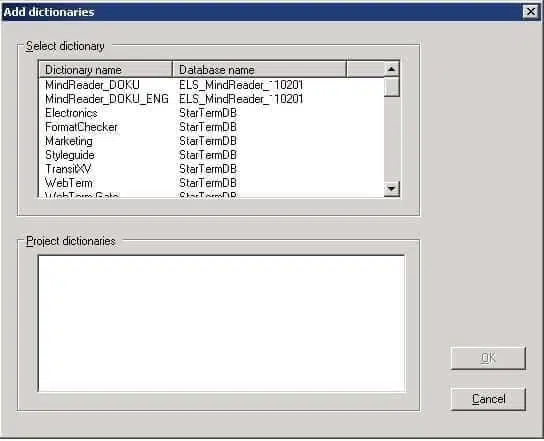
In the Select dictionary section Transit displays the dictionaries that you can access. In the right column Transit displays the name of the database in which the respective dictionary is saved.
By clicking on the column header Dictionary name and Database name you can sort the dictionaries or the databases alphabetically ascending or descending for a better overview.
In the Project dictionaries section Transit displays the dictionaries that are already defined as project dictionaries.
– In the Select dictionary section, select one or more dictionaries which you want to add to the project. Confirm your selection with OK.
Transit displays the Dictionaries window again with the dictionaries added. If necessary, you can now select a different current dictionary.
– To remove a dictionary from the project, select the dictionary in the Project dictionaries section and click Remove.
Transit will not delete the dictionary data from the database when a dictionary is removed, it will merely no longer use the dictionary in this project.
Click Next to confirm the settings made in the Dictionaries window.
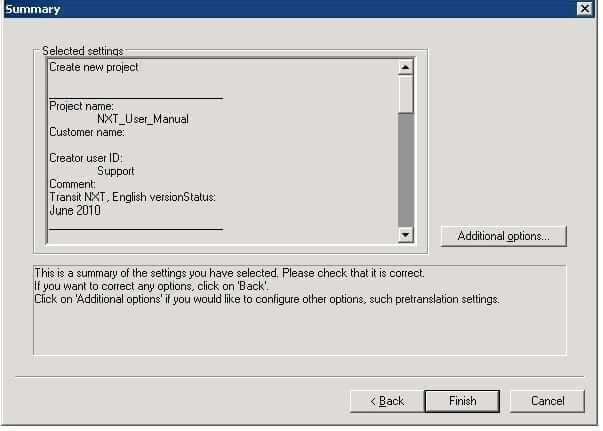
Transit displays the Summary window. This displays all the settings which you have previously specified for the current project:
 Summary window
10 Check your settings or specify additional, special settings:
– Click on Back if you want to change a setting.
– If you want to make additional special settings for segmentation, report settings, format check, default values, reference material, pretranslation or extracts, click Additional options.
Transit displays the Advanced project settings window, which contains the following tabs:
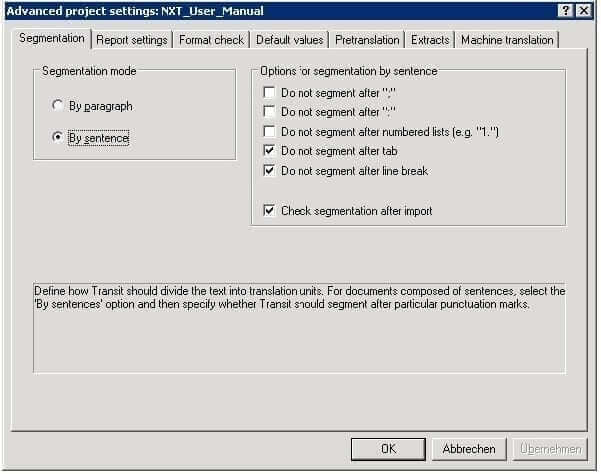 Advanced project settings window
Segmentation – Options for splitting the text into individual sections (segments). Please refer to section “’Segmentation’ project settings” for more detailed information.
Report settings – Settings for the Report Manager for analysing and invoicing your translation project. Please refer to section “’Report settings’ project settings” for more detailed information.
Format check – Options for verifying the consistency of formatting information, the representation of numbers and for detecting missing or redundant spaces. Please refer to section “’Format check’ project setting” for more detailed information.
Default values – Default values for dictionary entries made while working on the project. Please refer to section “’Default values’ project settings” for more detailed information.
Pretranslation – Settings for pretranslation based on the reference material. Please refer to section “’Pretranslation’ project settings” for more detailed information.
Extracts – Settings for the creation of reference and translation extracts. Please refer to section“’Extracts’ project settings” for more detailed information.
Machine translation – Generating translation suggestions using MT systems during import. Please refer to section “’Machine translation’ project settings”.
Configure the desired settings and confirm them by clicking OK.
Please refer to section “Project settings” for more information on this topic.
Once you have checked all the settings, confirm them by clicking Finish.
Transit creates the project with all the files and folders.
Once you have created a project, the next step generally is to import the files. For this reason, Transit displays the following message:
Project created successfully. Do you want to start the import process now?
11 Decide whether you want to import the files now or later:
– Click Yes if you want to import the files straight away.
Transit displays the Import project window.
– Click No if you want to import the files at a later stage.
You can carry out the import process at a later stage. However, you must import the files before you can start the translation.
3. Create a new project based on an existing project
If you choose to create a project based on an existing project, Transit suggests the existing settings from this project so you only have to modify the options which differentiate the new project from the old one. Please refer to section 2 “Creating a new project” if you would instead like to create a new project based on the default Transit settings.
How do I create a new project based on an existing project?
1 Select Project | Administration | Create.
Transit displays the Create new project window:
2 To create a follow-up project, select Based on project.
3 Select the project from the list which you want to use as the basis for your new project.
Click Next to confirm the option selected.
Transit displays the Administration window:
As the project name, Transit suggests the name of the old project with 1 appended to the end. The language pairs and reference material from the old project are set as the reference material, the old import files are discarded. All other settings from the old project remain unaltered.
4 Accept the suggested settings or change the settings for the new project. To do so, proceed as when creating a new project (see section 2 “Creating a new project” from step 4 onwards).
4. Creating a new project via the resource bar
The Transit resource bar contains a list of project templates in which important settings have already been predefined, allowing you to create a project quickly. A project created via the resource bar differs from a project created from scratch in the following respects:
- Project folder: Transit automatically saves the project to C:\Program Files\Transit_NXT\projects\. For the project name, Transit uses the name you have entered under Project name in the Administration window.
- File type: The file type is preselected when you choose the project template.
- Dictionary: The project wizard skips the Dictionaries window when you create a project via the resource bar.
Clicking the Additional options button in the Summary window takes you to the advanced project settings. Here, you can make further project settings before you finally create the project.
You can also change the settings at a later stage via Project | Administration | Settings.
Please refer to section 2 “Creating a new project” if you would instead like to create a new project based on the default Transit settings.
How do I create a project via the resource bar?
1 Click the Interfaces button on the resource bar.
2 Select the desired file type from the list (e. g. Office -> PowerPoint).
Transit displays the Administration window:
3 Specify the administrative information and proceed in the same way as when creating a new project.
File types which can be imported in Transit
The following table lists the file-type specific templates which Transit offers for project creation: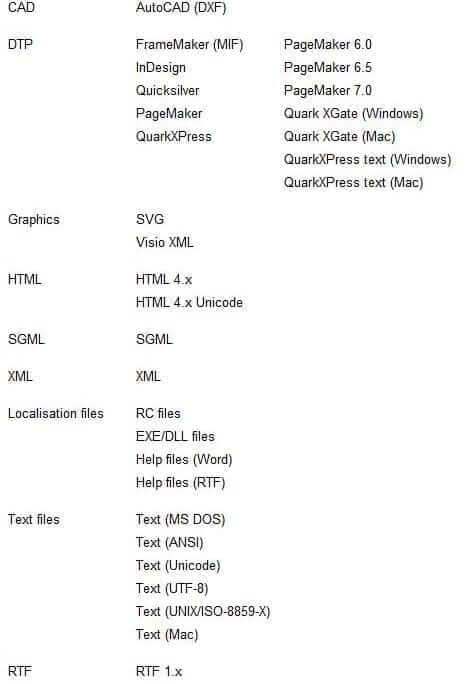 Templates for project creation
These options are also available from the ribbon bar by selecting Project | Administration | Create | Based on template.
5. Creating a new project template
You can also define project templates yourself in Transit according to your specific requirements. When you create a new project template, you can either create a template from scratch or base it on one of the default project templates that is available in Transit when you create a new project either via the ribbon bar (Project | Administration | Create) or via the resource bar.
How do I create a project template via the ribbon bar?
1 Select Project | Template | Create.
Transit displays the Create project template window:
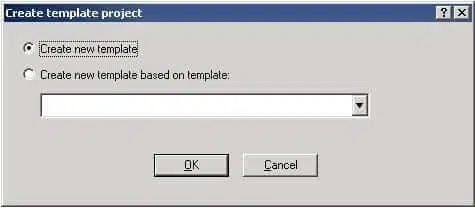
2 Select one of the following options to create a new project template:
– Create new template – Select this option if you want to create a new template from scratch.
– Create new template based on template – Select this option if you want to create a new template that is based on one of the default project templates. Select the required default project template from the list.
Confirm your selection by clicking OK.
Transit displays the Save project template as window:
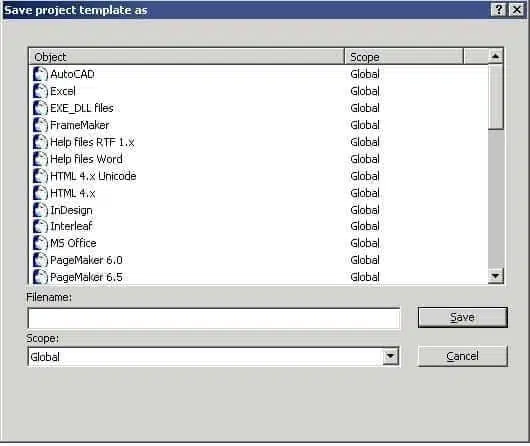
3 Specify how the new project template should be saved:
– File name – Enter the name of the project template here.
– Scope – Select the scope to which the project template should be assigned: Global, User (user-related) or Customer (customer-related).
Click Save to confirm the information specified.
Transit displays the Project-template settings window:

The name of the project template and the scope in brackets (e. g. Global) are also shown in the titlebar.
In addition to the project settings described in section 3.6, the Project-template settings window also contains the Wizard tab:
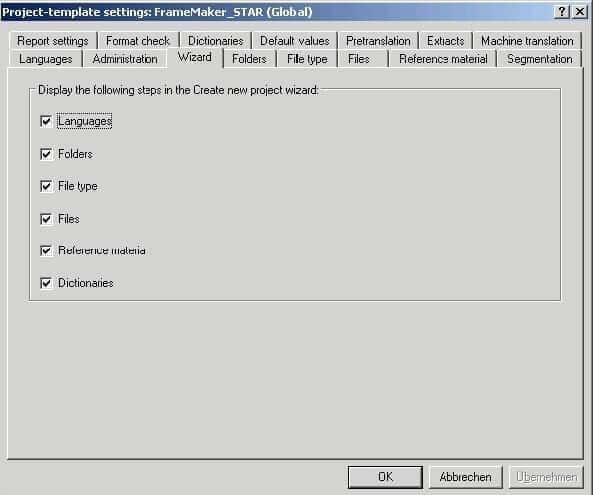 Project-template settings window, Wizard tab
4 In the Wizard tab, specify which steps should be considered when a new project is being created using this project template. The following steps (project settings) can be selected:
– Languages
– Folders
– File type
– Files
– Reference material
– Dictionaries
5 Make the required settings in the other tabs.
Confirm the settings in each tab with Apply. Click OK to conclude the project-template creation process.
6. Deleting a project template
User-defined project templates can also be deleted. The project templates supplied with Transit, which are specific to particular document types, cannot be deleted.
How do I delete a project template via the ribbon bar?
1 Select Project | Template | Delete.
Transit displays the Delete project template window:
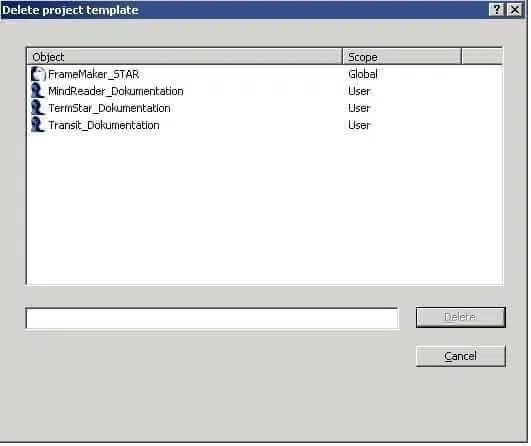
The list of the available project templates only displays the user-defined templates. The Delete button is greyed-out until a template is selected.
2 Select the project template which is to be deleted.
3 Click Delete.
7. Changing the default settings for new projects
If you create a new project from scratch, Transit suggests various default settings (e.g. for the source and target language; see section .2 “Creating a new project”).
You can change the default settings suggested by Transit for new projects, so that they match the requirements of your projects as closely as possible. This means that less changes will be necessary when creating a new project.
The default settings come from the project default, stored under scope Global. To change the settings, open the project default, alter the project settings and save it again under the same name.
How do I change the default settings?
1 Open the project default, which is stored under the scope Global.
– To do this, select Project | Open.
Transit opens the Project browser window.
– Select the project default from the list.
If Transit displays several projects of this name, select the default project stored under the Global scope.
– Confirm your selection by clicking OK.
Transit opens the default project.
2 Check the project settings and alter them as necessary.
– Select Project | Administration | Settings.
Transit displays the Project settings: default (Global) window. On the tabs, Transit displays the project settings which are suggested when a new project is created.
– Alter these project settings as necessary so that Transit will suggest these modified settings for future projects.
Only alter those settings which are useful as suggestions for all new projects (e.g. for the source and target language).
– Do not change any settings which usually differ from one project to the next (e.g. files, reference material, dictionaries, default values, etc.).
You will find information on the project settings in section 3.6 “Project settings”.
– Confirm the changes made with OK.
3 Save the modified project default.
– Select Project | Save as.
Transit displays the Save project window.
– Select the project default from the list.
If Transit displays several projects of this name, select the default project stored under the Global scope.
– Click Save to confirm your choice.
Transit displays a message informing you that the project already exists.
4 Click OK to confirm that you want to overwrite the existing project.
Transit saves the default project and its settings are the immediately available to act as suggested settings for new projects.

