Transit NXT Quick Guide
In this guide we show you how to get the most from Transit by showing some of the key features and shortcuts. As translators ourselves we’ll show you how we use Transit and the advanced features of some of the core functions.
Having read this – you will learn how to make your translation easier.
1. Find
In Transit, as with every word processing program, you can search for any string.
Transit displays various messages if it cannot find the string you are searching for (see Table 5-10).
How do I search for a string?
1 Place the cursor in the window in which you wish to search.
OR
Select the string that you want to find.
2 Select Processing | Search | Find.
Transit displays the Find tab in the Find/Replace window:
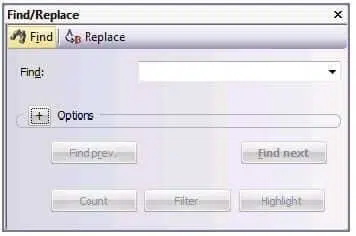
3 Enter the search string in the Find field.
If you have selected the string previously, it is automatically inserted in the Find field.
4 To set additional options for the search, click on the + button in the Options section.
Transit expands the window to display the following options:
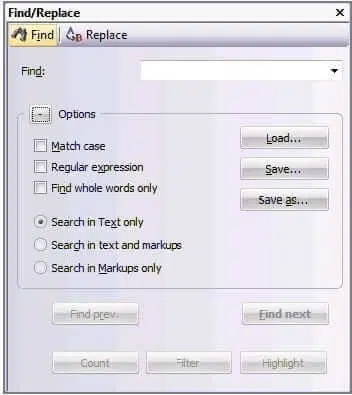
– Match case – Select this option if you only want Transit to find strings which precisely match the case of the character string entered in the Find field.
– Regular expression – Transit will interpret the string as a regular expression. Please refer to the Transit/TermStar NXT Reference Guide for details on regular expressions.
– Find whole words only – Select this option if you want Transit to search for strings as whole words and not as a part of another word.
You can also specify where Transit should search for the string:
– Search in text only – Transit will only search in the text, not in the markups.
– Search in text and markups – Transit will search both in the text and in the markups.
– Search in markups only – Transit will only search in the markups, not in the text.
You also have the option to save find operations so you can call them up again, if required, at a later point in time:
– Load is used to call up a saved search.
– Save is used to save the current search.
– Save as is used to save a loaded search under a different name.
5 You also have the option to get an overview on the search result before searching:
– Count informs you on how often the search string occurs in total.
– Filter displays only the segments that contain the search string.
By clicking Filter off you can switch off the filter again.
– Highlight all occurrences of the search string in green.
By clicking Highlight off you can switch off the highlighting again.
–
6 Click Find next or Find previous to search for the string.
Transit searches for the string.
Transit highlights the string it has found or displays a message.
7 You can now proceed either by clicking on Find next or Find previous or by entering a different string and searching for that.
– If you no longer require the Find/Replace window, you can close it by clicking on X on the right of the titlebar.
– It is also possible to integrate the Find/Replace window with the user interface by docking it.
Transit displays one of the following messages if it cannot find the string:
 Messages if Transit cannot find a string
2. Find/Replace
In Transit, as with any other data processing program, you can search for any string and have it replaced with another string.
Transit displays various messages for you to respond to if it cannot find the string you are searching for.
How do I find and replace a string?
1 Place the cursor in the window in which you wish to perform the find/replace operation.
2 Select Processing | Search | Replace.
Transit displays the Replace tab of the Find/Replace window:
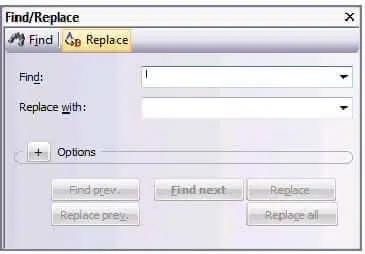
3 Enter the search string in the Find field.
4 In the Replace with field, enter the string which Transit will use to replace any instances it finds of the specified string.
5 To set additional options for the search, click on the + button in the Options section.
Transit expands the window to display the following options:
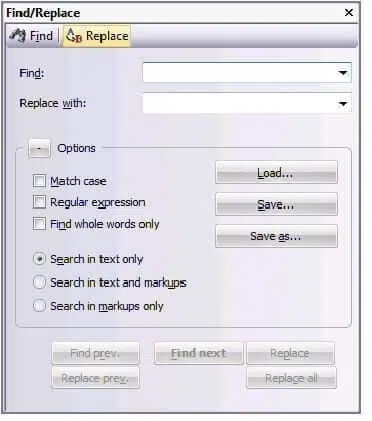
– Match case – Select this option if you only want Transit to find and replace strings which precisely match the case of the character string entered.
– Regular expression – Transit will interpret the string as a regular expression. Please refer to the Transit/TermStar NXT Reference Guide for details on regular expressions.
– Find whole words only – Select this option if you want Transit to search for strings as whole words and not as a part of another word.
You can also specify where Transit should search for the string:
– Search in text only – Transit will only search in the text, not in the markups.
– Search in text and markups – Transit will search both in the text and in the markups.
– Search in markups only – Transit will only search in the markups, not in the text.
You also have the option to save find/replace operations so you can call them up again, if required, at a later point in time:
– Load is used to call up a saved find/replace operation.
– Save is used to save the current find/replace operation.
– Save as is used to save a loaded find/replace operation under a different name.
6 Click Find next or Find previous to search for the string.
Transit searches for the string.
7 Transit highlights the string it has found. You can now specify whether you want to replace the string:
– To replace the string found, click on Replace or Replace previous.
Transit replaces this string and continues the search forwards or backwards.
– If you do not want to replace the string it has found, click on Find next or Find previous.
Transit leaves this string unchanged and continues the search forwards or backwards.
– If you want to interrupt or exit the process, click on X.
Transit closes the Find/Replace window.
– If you want to replace all strings found without further prompting, click on Replace all.
Transit will replace this string, then continue the search and automatically replace all the other matching strings it finds.
After this, Transit displays a message with the number of strings found and replaced.
Example: 12 found, 12 replacements made
Transit displays various messages similar to those seen in the Find function if it cannot find the string you are searching for.
8 If you no longer require the Find/Replace window, you can close it by clicking on X on the right of the titlebar.
– It is also possible to integrate the Find/Replace window with the user interface by docking it.
3.Deleting text
In Transit you can delete text in the usual manner with the BACKSPACE or the DEL key. However, it is also possible to quickly delete the text in question using the Delete to end of segment option. This can be found under Processing | Translate. The dropdown menu from the Confirm button allows you to select or deselect this option. When it is selected, Transit will automatically delete the source text (underlined in red) when the user presses the ALT+INS shortcut.
Markups which Transit deletes with the text
If there are markups you wish to delete in the text, Transit will delete these as well. Markups in the other segments are not affected by this.
4. Moving or copying text
You can move or copy text in Transit with the mouse.
How do I move or copy text with the mouse?
1 Select the text you want to move or copy.
– To move the text you have selected, hover the mouse pointer over the selected text, then press and hold the left mouse button. Then drag the text with the mouse to the position where you want to insert it.
– To copy the text you have selected, press and hold the CTRL key and drag the highlighted text to the position where you want to insert it.
5. Inserting Unicode characters
Using the Character map option in Transit, you can insert any Unicode character which can be represented by the current character set. In doing so you can choose from various character groups.
How do I insert a Unicode character?
1 Place the cursor at the position where you want to insert the Unicode character.
2 Select Edit | Text | Character map.
Transit displays the Character map window:
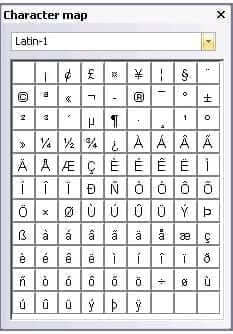 Character map window
3 Select a Unicode character group from the list (e.g. Latin-1).
Transit shows the characters from the group selected in the character map.
4 Click on a character to insert it at the cursor position.
Transit inserts the character at the cursor position.
The window remains open so that you can insert more Unicode characters.
5 If you no longer require the Character map window, you can close it by clicking on X on the right of the titlebar.
– It is also possible to integrate the Character map window with the user interface by docking it.
6.Selecting the keyboard layout
You may have defined several so-called input languages in Windows to make it possible to enter text in different languages using the respective keyboard layout.
In such a case, Transit automatically selects the correct keyboard layout for each window and each dictionary entry.
Example: you are working on a German to English translation project:
- When the cursor is in the source-language pane (German), Transit selects the German keyboard layout.
- When the cursor is in the target-language pane (English), Transit selects the English keyboard layout.
- When the cursor is in a German dictionary entry, TermStar NXT selects the German keyboard layout.
- When the cursor is in an English dictionary entry, TermStar NXT selects the English keyboard layout.
The currently selected input language is indicated in the Windows taskbar:
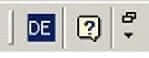 Windows taskbar: German is selected as the input language
This must be enabled by selecting the appropriate setting in the Windows Control Panel (for example, in Windows 7, from the Start menu select Settings | Control Panel | Regional and Language Options, Languages tab, then the Details button).
You have the following options for switching language manually:
- From the Windows taskbar, select the language which Windows should use:
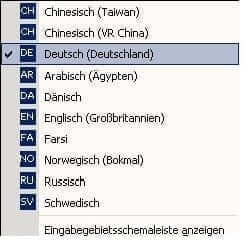 Windows taskbar: switching input language
This change will apply until the next time Transit selects the language automatically.
- You can use the Windows keyboard shortcuts to switch between the different languages.
By default, Windows uses the keyboard shortcut ALT (left) + SHIFT. You can change this shortcut in the Windows Control Panel.
This change will apply until the next time Transit selects the language automatically.
Switching off automatic keyboard-layout selection
You have the following options for switching off automatic keyboard-layout selection:
– You can deselect the Automatic keyboard switch option under Edit | Miscellaneous.
Please refer to section 8.3.18 “Activating/deactivating automatic keyboard-layout switching” for more detailed information on this topic.
– Remove any languages which you do not require. Transit can only switch between languages that you have added.
7. Moving the cursor
You can move the cursor in the editor with ribbon bar commands or keyboard shortcuts.
The next table shows the ribbon bar commands for moving the cursor and the relevant shortcuts.
Moving the cursor in internal repetitions mode
If you are working in internal repetitions mode, Transit provides other possibilities for moving the cursor.
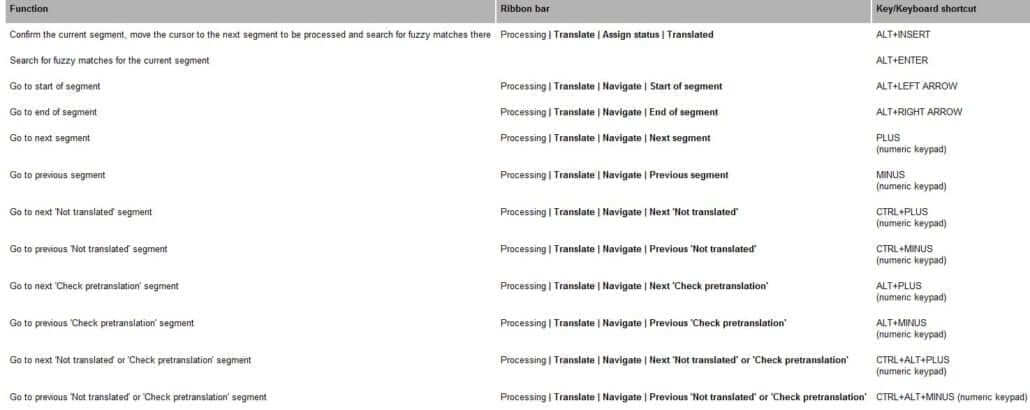 Moving the cursor in the editor
8. Moving the cursor to specific segments
You can also move the cursor to a particular location in the language pair which is currently open. You have the following options:
- Go to a segment with a specific number
You will find the number of the segment in which the cursor is located in the column on the left-hand side of each of the editor panes and in the status bar at the bottom of the window (Seg.: ). You can find more detailed information on this here.
- Go to a line with a specific number
You will find the number of the line in which the cursor is located in the status bar at the bottom of the window (Line.: ). You can find more detailed information on this here.
If you have the Formatting or Structure options – for ‘WYSIWYG’ display of formatting and document structure – selected under View | Text/Markups | Options, the line number is not displayed.
- Go to a bookmark
You can bookmark text in the Transit editor so you can move the cursor quickly to the bookmarked text. The bookmarks can be deleted if you no longer need them. Transit automatically removes bookmarks during export so there are no “Transit-related” marks in the target-language original format.
- Go to a retained position
You have the option to set a flag in the text so that Transit can ‘memorise’ a particular position in the text. After you have checked something at a different location, you can easily find your way back to the flagged position in the text.
- Go to a segment for which comments have been entered
How do I move the cursor to a segment or to a line?
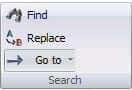
1 First select the unit type to which you want to move the cursor, under Processing | Search | Go to:
 Go to search function
– Segment
– Line – If the Formatting or Structure options are selected for ‘WYSIWYG’ display of tables and structure, this option is not available.
– Bookmark – If you have set a bookmark, Transit can move the cursor to the bookmark.
2 In the field to the right of the dropdown, enter the number of the segment, line or bookmark to which you want to move the cursor.
3 Click on Go to or press the ENTER key.
Transit moves the cursor to the selected position. The cursor does not move if you enter an invalid value.
How do I set a bookmark?
1 Move the cursor to the position at which you wish to set a bookmark.
2 Under Edit | Text, click on the Bookmark option.
Transit displays the Bookmark window:
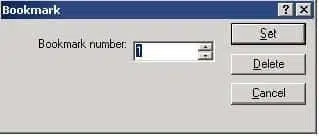
3 Enter a number for the bookmark.
Using this number, you can go to this position via the Processing | Search | Go to option.
4 Click Set to confirm the settings.
Transit sets the bookmark at the cursor position.
How do I delete a bookmark?
1 Select Edit | Text | Bookmark.
Transit displays the Bookmark window.
2 Enter the number of the bookmark you want to delete.
3 Click Delete to delete this bookmark.
Transit deletes the bookmark specified.
How does Transit retain the current position of the cursor?
1 Move the cursor to the position Transit should retain.
2 Select Edit | Text | Set flag:
![]() Retain position icon
Retain position icon
Transit notes the position. You can now move the cursor to another position.
Transit only retains the position as long as the language file is open. Transit will no longer be able to find the position if you close the language file and open it later.
How do I jump back to the retained position?
1 To move the cursor back to the retained position, select Edit | Text | Go to flag:
![]() Go to flag icon
Go to flag icon
Transit moves the cursor to the retained position.
9. Formatting text manually
In addition to being able to assign markups to translated text in Transit, you can also manually assign bold, italic or underline font attributes to the font style. In this case, Transit does not use the character formats that may have been assigned in the source file or format templates. Instead it only assigns the bold, italics or underline font attributes.
This means that you can format a word more quickly if, for instance, a word is marked with quotation marks in the source language and you wish to mark it in bold in the target language.
Manual formatting or update markups?
In various programs (e.g. Word, FrameMaker), it is possible to specify so-called “Character formats”, “Character templates” or “Format templates” for the character formatting. Transit uses markups instead of these formats.
If you format the text manually, Transit does not use these markups, but rather assigns the desired attribute to the text (e.g. underline or bold).
For this reason, where applicable, you should ask your customer to confirm how the text should be formatted before formatting the text.
——————————————————————————–
How do I format the text manually using formatting commands?
1 Highlight the text that you wish to format.
2 Under Edit | Formatting click on the icon for the formatting you require:
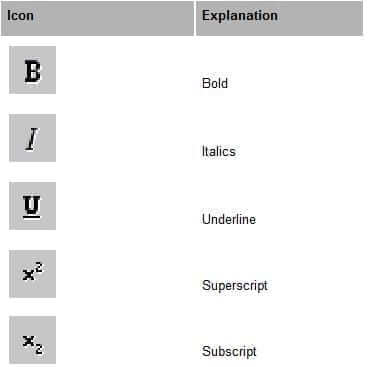
Icons for formatting text manually
Transit assigns the font style to the highlighted text and inserts the appropriate markups. The appearance of markups in the Transit editor is dependent upon the settings selected under View | Text/Markups.
10. Deactivating write protection for the source language
The text in the source language is always write-protected so that you do not inadvertently change the text. If this happened, the language pair would no longer agree with the imported source document and you would be unable to use your translation as reference material.
However, it may be necessary to change the text in the source language in certain cases – if you have found typing errors in the original document, for example.

It is recommended that you reactivate write protection for the source language as soon as you have made your changes. In this way you can avoid the source language text being changed accidentally.
——————————————————————————–
How do I deactivate write protection for the source language?
1 Place the cursor in the source-language text.
2 Uncheck the Read-only option under Edit | Text.
Transit deactivates write protection for the source language.
3 Correct the errors in the text.
We recommend you reactivate write protection immediately afterwards.
How do I reactivate write protection for the source language?
1 Place the cursor in the source-language text.
2 Click on Read-only under Edit | Text.
Transit reactivates write protection, as indicated by the checkmark in front of this option.
11. Using AutoText to insert frequently occurring text
In Transit, you can save frequently occurring text as ‘AutoText’. You then have two options for inserting this text into your translation:
- Type the name of an AutoText entry and Transit will replace it
Instead of the text itself, you enter the name of an AutoText entry into the editor; Transit then automatically inserts the required text.
Example: The expression STAR Group occurs repeatedly in your text. You save these words as an AutoText entry and specify sg as the name of the entry. Then all you have to do is enter sg and Transit will replace the string with the expression STAR Group.
- Select from the list of AutoText entries
Transit displays the names of all the expressions you have saved as AutoText entries in one window. You can select the desired entry from this list, then Transit will enter it into your translation.
How do I create an AutoText entry?
1 Select the text in Transit you want to save as an AutoText entry (in the example, STAR Group).
2 Select Edit | Text | AutoText.
Transit displays the AutoText window:
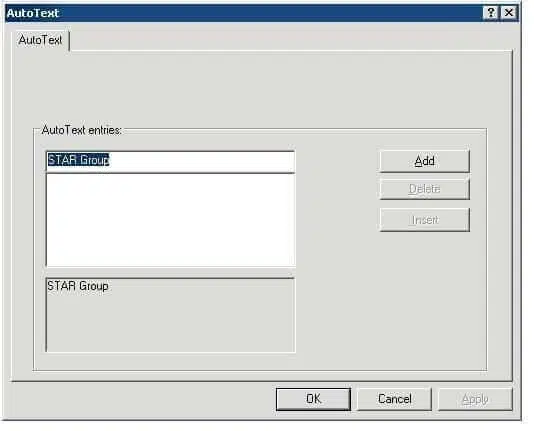
– top field – Name of AutoText entry.
The top field initially displays the text you selected as the name for the AutoText entry (in the example, STAR Group).
– middle field – List of names of all available AutoText entries.
– bottom field – Text which Transit should insert as AutoText (in the example, STAR Group).
3 In the top field, enter a name for the AutoText entry:
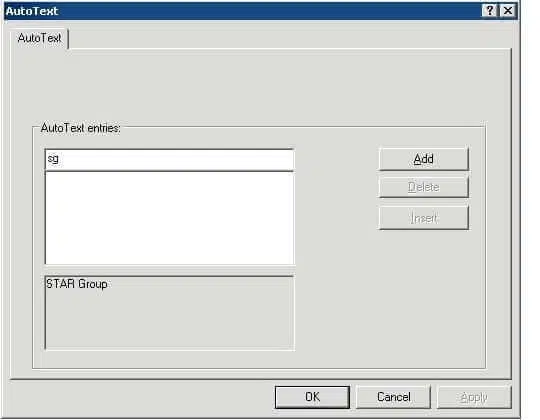
You can enter this name in your translation instead of the text itself (in the example, sg). Transit automatically replaces the name with the AutoText.
4 To confirm your entry, click Add.
Transit will use the specified name as an abbreviation for the text displayed in the bottom field. Transit now also displays the name string in the centre field.
Transit saves AutoText entries on a user-related basis at \config\users\\ in the file default.prf. An AutoText entry appears in this file below [AutoText] as soon as you open the User preferences window and click Save.
——————————————————————————–
How do I enter AutoText while translating?
1 Enter the name of the AutoText entry in the target-language window (in the example, sg).
2 Immediately press the F3 key to make Transit replace the name with the AutoText (in the example STAR Group).
How do I select an AutoText entry from the list?
1 Place the cursor in the target-language window at the point at which Transit should insert the AutoText.
2 Select Edit | Text | AutoText.
Transit displays the AutoText window with its three fields. The centre field displays the names of all the AutoText entries saved.
3 In the centre field, select the name of the AutoText entry which Transit should insert into your translation.
Once you select a name, the bottom field displays the AutoText which will be inserted into the translation.
4 Click Insert to insert the text into your translation.
Transit enters the saved AutoText into your translation at the cursor position.
How do I delete an AutoText entry?
1 Select Edit | Text | AutoText.
Transit displays the AutoText window with its three fields. The centre field displays the names of all the AutoText entries saved.
2 In the centre field, select the name of the AutoText entry which you want to delete.
Once you select a name, the bottom field displays the AutoText which belongs to the selected name.
3 Click Delete to delete the AutoText entry.
Transit deletes the AutoText entry.
4 Close the AutoText window by clicking OK.
12. Opening language files using the “File navigation” window
The languages files within a project are normally opened via Project | Administration | Open language pair or via the Quick Access Toolbar. Transit offers a further possibility with the File navigation floating window. The Files tab in this window provides a separate view of all the files contained in a project and their hierarchy, and also allows you open these files in the Transit editor right from the window with a double click.
Navigation via the File navigation window is of particular use when working with resource files. Clicking on a dialog name or a particular element in the tree structure displayed in this window takes you directly to the corresponding segment in the Transit editor.
In addition, the File navigation window contains the Error (type) and Error (file) tabs that serve as error display. This error display is updated when a format check or terminology check or a an error report via the Report Manager Quality Check is performed.
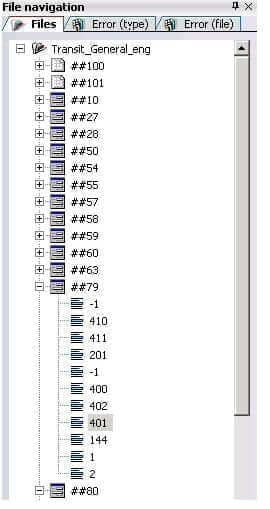 File navigation window
13. RC editor
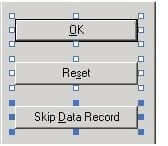
The RC editor is a tool for localising resource files. It offers a comprehensive set of options for working with binary resource files, for example, for resizing and repositioning the window elements contained within these files. In the RC editor, you can alter the size or position of a window element, or select several elements at once to arrange them on the interface, as required. In addition, the Markup window allows you to check which letters you have already used for accelerator keys in the current translation, thus avoiding accelerators being assigned multiple times. The File navigation window provides you with a separate view of the files in the project and can also be used to jump to specific dialog names or window elements.
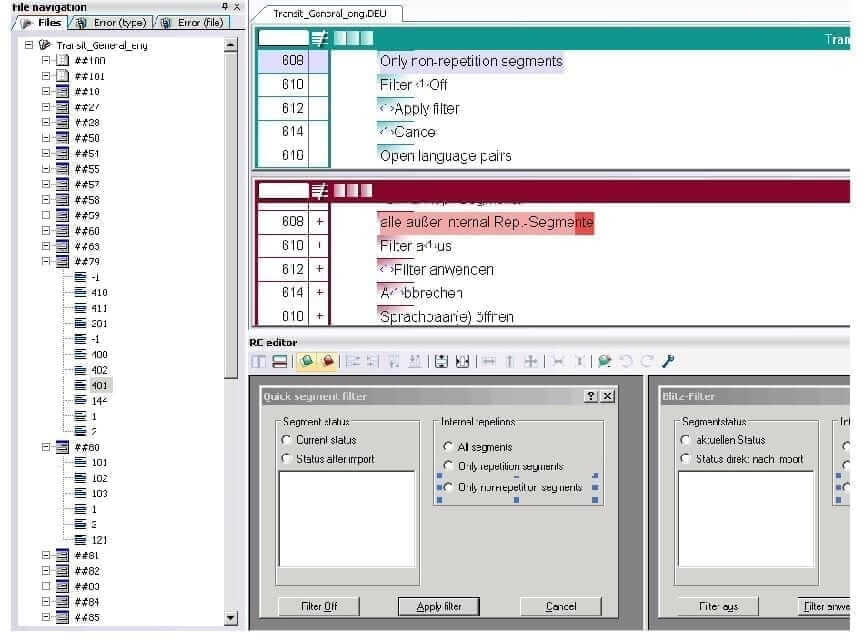 The working environment when using the RC editor
For information on how to select and show the viewers, please refer to the instructions under “How do I select a viewer?”.
The RC editor toolbar offers the following view and resizing options:
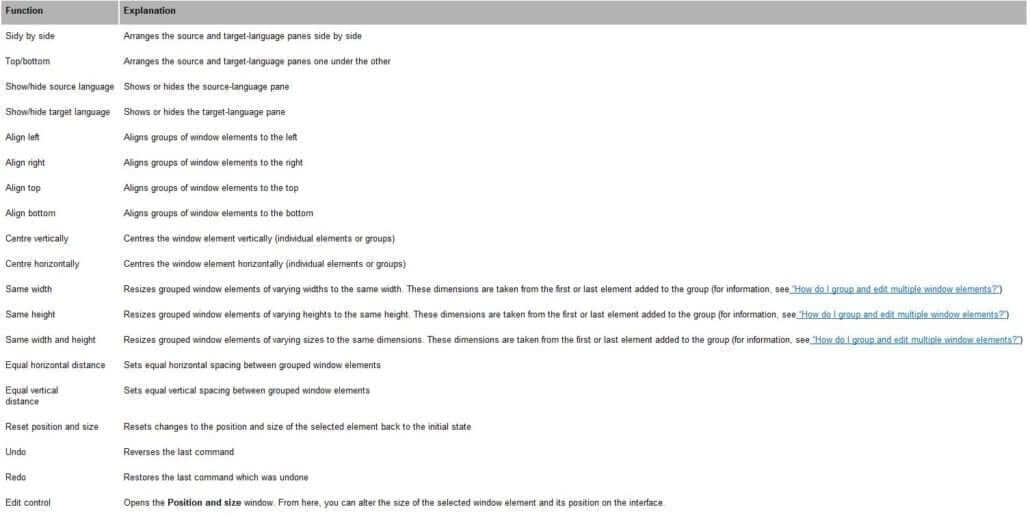 RC editor – toolbar functions
How do I group and edit multiple window elements?
1 Click on the first window element you want to add to the group.
The element is highlighted with blue resizing handles.
2 Press and hold the CTRL key.
3 Add other elements to the group by clicking on them.
Window elements grouped in this way are indicated by the presence of resizing handles. If, for example, the Same width and height command is selected, the last window element added to the group determines the size of all the elements in the group. This element can be identified by the blue resizing handles. The other elements are indicated by white resizing handles:
 Grouping window elements in the RC editor
If you press the SHIFT key, instead of the CTRL key as described in point 2, the first element selected will determine the dimension in question for all the elements in the group. This element can be identified by the blue resizing handles.
4 Now select the desired function from the RC editor toolbar to alter the size and position of the grouped window elements.
AutoResize with resource DLLs on WPF basis
If in resource DLLs on WPF basis the automatic size adjustment of UI elements (AutoResize) was set, this is also taken over for the localisation and display in the RC editor, i. e. the size of the elements is automatically adjusted to the text lenght. The circumstance that the height and width of elements cannot be replaced by user-defined values, is in this case volitional.
——————————————————————————–
How do I handle a translation project in the RC editor?
1 Open or unpack the project.
2 Move the mouse pointer over the resource bar and select the File navigation window from the context menu.
Transit shows the File navigation window.
3 If necessary, also call up the RC editor window and the Markup window using the method described in point 2. If you often work on projects containing binary resource files, it is recommended that you select the appropriate user role or set up a window layout which is suited to this purpose.
4 In the File navigation window, double click on the binary resource file you would like to edit. Please note that this is the only way to individually select window elements. Opening language files via the ribbon bar or the Quick Access Toolbar displays the first segment of the opened file in the Transit editor.
Transit opens the selected language file in the Transit editor.
5 Translate the text.
– If the length restriction is exceeded, the text in the segment is highlighted in light and dark red. The section of the text highlighted in dark red is the part which surpasses the length restriction .
– If it is necessary to change the position or size of window elements, proceed as described in the section “How do I group and edit multiple window elements?”.
– The process for handling and inserting accelerator keys is the same as that used for handling markups.
Example of inserting accelerator keys during translation:
The source-language term Abbrechen has been translated with Cancel. Instead of the letter A which is used in the source language, in the target language, accelerator key C for Cancel is used. Place the cursor to the left of the letter C and then press CTRL+1 to assign the accelerator key C to the Cancel command:
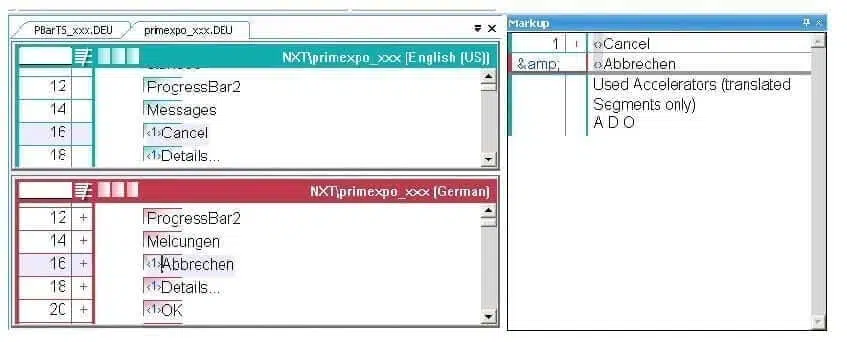
The accelerator key is indicated by a superscripted 1 to the left of the selected letter. In addition, the Markup window indicates which letters have already been used as accelerators in the translation of the current window or menu. This information in the Markup window is only for information purposes. After your translation is complete, you can carry out a check for unassigned accelerator keys via markup mode or format check. The check for accelerators which have been assigned more than once can only be carried out via the format check.
Using the shortcut CTRL+SHIFT+ you can define accelerator keys in the target language which have no equivalent in the source language. This may be useful if an accelerator is missing in the source language, but needs to be inserted for the target language.
6 Continue with the process described under point 5 until you have finalised the translation.
